She believes food has become linked to convenience and ticking a box as lives become busier which has negatively impacted on people’s relationship with food and their kitchens.
So she hopes her new book Food for the Soul will give people recipes and options for times when people do have the opportunity for themselves to get into their kitchen and enjoy themselves.
Lord, who is an Australian-based instagrammer known for her healthy recipes, aims to create recipes that are simple and special and do not leave a pile of washing up.
"I’m passionate now about creating recipes that really support a busy lifestyle than hinder it; it should be one less thing to worry about , not an additional strain on your to-do list."
Some are quick and easy ready in under 15 minutes while others are more suited to a lazy Sunday.
She is a big believer in the freezer something she used to take for granted and creating recipes which can be turned into different dishes to use leftovers and reduce food waste.
"I like to encourage people to eat more mindfully and to enjoy food as an experience rather than something to fear, stress or worry about."
Lord says just as money means more to people if they work hard for it, when people spend time and effort in creating meals in the kitchen they are more likely to take time to enjoy them, as well as being more conscious of ingredients.
She wants to remove the "elitism" around "eating well" and the idea that it takes a lot of time, fridge space and money to do so.
"I don’t believe in discriminating against food, nothing is good or bad."
Her recipes are broken into chapters based on essential staples, mains ("say no to shit salads"), inbetweens and afters.

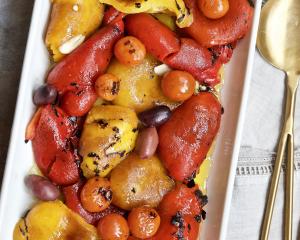
Roast beetroot, balsamic and thyme soup
Earthy and sweet, beetroots are one of my favourite vegetables and roasting them with balsamic vinegar adds more depth to their flavour.
Serve with a swirl of yoghurt and some crunchy bread; I also like to sprinkle over some hazelnut and pistachio dukkah. Simple yet beautiful.
Serves 4
Vegan, Gluten-free
500g raw beetroots, scrubbed and cut into cubes
3 Tbsp olive oil
2 Tbsp balsamic vinegar
2 sprigs of thyme, leaves removed
1 yellow onion, sliced
2 leeks, sliced
1.5 litres vegetable stock
sea salt and freshly ground black pepper
To serve
4 Tbsp natural yoghurt
4 Tbsp dukkah (see below)
chopped fresh dill
Dukkah
50g hazelnuts
50g pistachios
25g black/white or mixed sesame seeds
4 Tbsp coriander seeds
2 Tbsp cumin seeds
1 Tbsp dried thyme
½ tsp salt
Optional
pinch of chilli flakes
freshly ground black pepper
Method
1. Heat the oven to 220degC/200degC fan.
2. Place the cubed beetroot on a baking tray and drizzle over half the olive oil, the balsamic vinegar, thyme leaves and a good pinch of salt. Roast in the oven for 45-60 minutes until the beetroot is tender and starting to caramelise.
3. Meanwhile, heat the remaining olive oil in a heavy-based saucepan over a medium heat and saute the onion and leeks until soft and translucent, about 15 minutes.
4. Stir the roasted beetroot chunks into the pan and pour over the stock. Bring to the boil then reduce to a simmer for 5 minutes. Remove from the heat and then use a hand-held blender to blitz the soup until its smooth. Season to taste.
5. Pour into bowls and top each with a dollop of natural yoghurt, a tablespoon of dukkah, some fresh dill and a good crack of black pepper.
Notes: Store in the fridge for up to 5 days or freeze for up to 3 months. To make this dairy free, use coconut or soya yoghurt.
Dukkah
1. Heat the oven to 200degC/180degC fan.
2. Spread all the nuts on a baking tray and roast in the oven for 8-10 minutes. Toast all the seeds in a dry frying pan over a medium heat until toasted and fragrant.
3. Remove the nuts from the oven and while hot, rub the hazelnuts with a tea towel to remove the skins. Add the seeds, nuts and remaining dukkah ingredients to a food processor and pulse to a rough crumb.

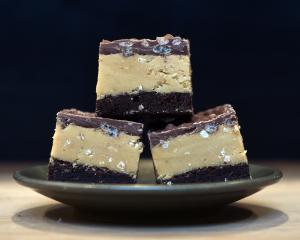
Overnight cinnamon buns with maple cream cheese glaze
Nothing beats the smell of cinnamon buns filling the kitchen in the morning. These are perfect with a hot coffee after a morning walk! I’ll whip them up the day before if I have friends staying over.
Leaving the cinnamon buns to have their second prove in the fridge overnight allows the yeast to develop more, giving an even deeper flavour. But of course they can be made, baked and eaten the very same day!
Spreading the cream cheese glaze over the buns whilst they’re still warm is essential, as this is what gives them their sticky texture, even once they’ve completely cooled.
These are probably the most technical bake in the book, but perhaps the most special.
Makes 12 buns
225ml milk
1 Tbsp active dried yeast
90g granulated sugar, plus 1 Tbsp
550g strong white bread flour
1 tsp ground cinnamon
1 tsp salt
1 tsp vanilla bean paste (or use vanilla extract)
2 large eggs
75g butter, melted
For the filling
6 Tbsp butter, at room temperature
180g soft dark brown sugar
2 Tbsp ground cinnamon
Maple cream cheese glaze
120g cream cheese
3 Tbsp butter, at room temperature
75g icing sugar
1 tsp vanilla bean paste (or use vanilla extract)
4 Tbsp maple syrup
pinch of salt
Method
1. Gently warm the milk in a pan until it’s bath-water warm, then pour into a jug and add the yeast and the tablespoon of sugar. Stir to mix and then leave to activate for 5 minutes, or until it goes foamy.
2. Put the flour, cinnamon and salt into a large bowl. In a separate bowl, combine the 90g granulated sugar, vanilla, eggs and melted butter and then pour this into the bowl of flour along with the activated yeast milk. Mix with a spoon until a dough forms.
3. Turn out on to a lightly floured surface and knead for 8-10 minutes until a smooth dough is formed and the dough is no longer sticky. Transfer this dough to a clean and lightly oiled bowl, then cover with cling film and leave to rise in a warm place for about 1 hour, or until doubled in size. Meanwhile, grease and line a 30 x 20cm baking tray with non-stick baking paper.
4. Without disturbing the risen dough too much, roll it out on a lightly floured surface to a large rectangle, about 40 x 60cm. Spread the softened butter all over the dough rectangle, leaving an unbuttered 1cm border on all sides. Mix the sugar and cinnamon together and sprinkle this all over the dough, using your fingers to press it into the butter.
5. Starting at a long edge, tightly roll the dough up like a Swiss roll, pinching at the end to seal and keep a tight roll. Use a very sharp knife to score and then cut the roll into 12 slices, each about 4cm thick. Trim off any loose ends.
6. Place the rolls in the greased baking tray, cover tightly with cling film and place in the fridge overnight, or for at least 12 hours.
7. When you are ready to bake, remove the cinnamon rolls from the fridge, uncover and allow to come to room temperature for about 1 hour. Meanwhile, preheat the oven to 200degC/180degC fan.
8. Bake for 20-25 minutes until starting to turn golden around the edges and the dough is firm to touch and hollow when tapped with a wooden spoon.
9. Make the cream cheese glaze by combining everything with a hand-held electric whisk in a small bowl.
10. Remove the cinnamon buns from the oven and whilst they are still warm and in the baking tray, generously spread the glaze over the top. Enjoy warm or keep for 2-3 days in an airtight container at room temperature or up to 5 days in the fridge.
Note: If you have a stand mixer, use the dough hook attachment to mix and knead the dough. These can be frozen once baked or after the first proving; allow to defrost overnight in the fridge and then bake as above.

Slow-cooker pulled barbecue chicken sliders
with chipotle lime mayonnaise
This is one of my favourite recipes in the whole book. It's ideal for larger groups and perfect to serve in the slow cooker surrounded by a build-your-own-burger station.
And it’s the gift that keeps on giving: use leftovers piled on top of nachos or pizza, alongside slaw, or in a grilled cheese toastie.
Serves 8
2 Tbsp olive oil
8 skinless and boneless chicken thighs
2 yellow onions, halved and sliced
2 garlic cloves
2 tsp paprika
200g barbecue sauce
4 Tbsp honey
2 Tbsp tomato purée
1 Tbsp Worcestershire sauce
2 Tbsp soft light brown sugar
1 tsp salt
juice of 1 lime
Chipotle lime mayonnaise
8 Tbsp mayonnaise
1 Tbsp chipotle paste
1 tsp smoked paprika
juice of 1 lime
pinch of salt
To serve
8 brioche buns
2 avocados, thinly sliced
Method
1. Set the slow cooker to low. Warm 1 tablespoon of the olive oil in a frying pan over a medium-high heat and brown the chicken thighs in batches, transferring them to the slow cooker as you go.
2. Add the remaining oil to the pan and fry the onions until they're soft and translucent, then add the garlic and paprika and saute for another minute, then transfer to the slow cooker.
3. Add the remaining ingredients, except the lime juice, straight into the slow cooker and cook for 6-8 hours on low.
4. Once the chicken is ready, turn off the heat and shred it with 2 forks. Squeeze over the lime juice and then leave to cool and absorb the flavours for at least 15 minutes before serving.
5. Make the chipotle lime mayonnaise by whisking all the ingredients together with a fork.
6. Toast the brioche buns under a hot grill. Assemble the sliders with the pulled chicken on the bottom, sliced avocado and chipotle mayo on top.