
• Text, photographs and concept by Jonathan Howard
Following on from the Heritage in Focus feature There yesterday, gone today?, on the New Zealand and South Seas Exhibition, 1925-26, here we're looking at the earlier 1889-90 New Zealand and South Seas Exhibition.
Between November 26, 1889 and April 19, 1890 there were 625,248 visitors, 39,607 short of the estimated total population of Aotearoa New Zealand in 1889.
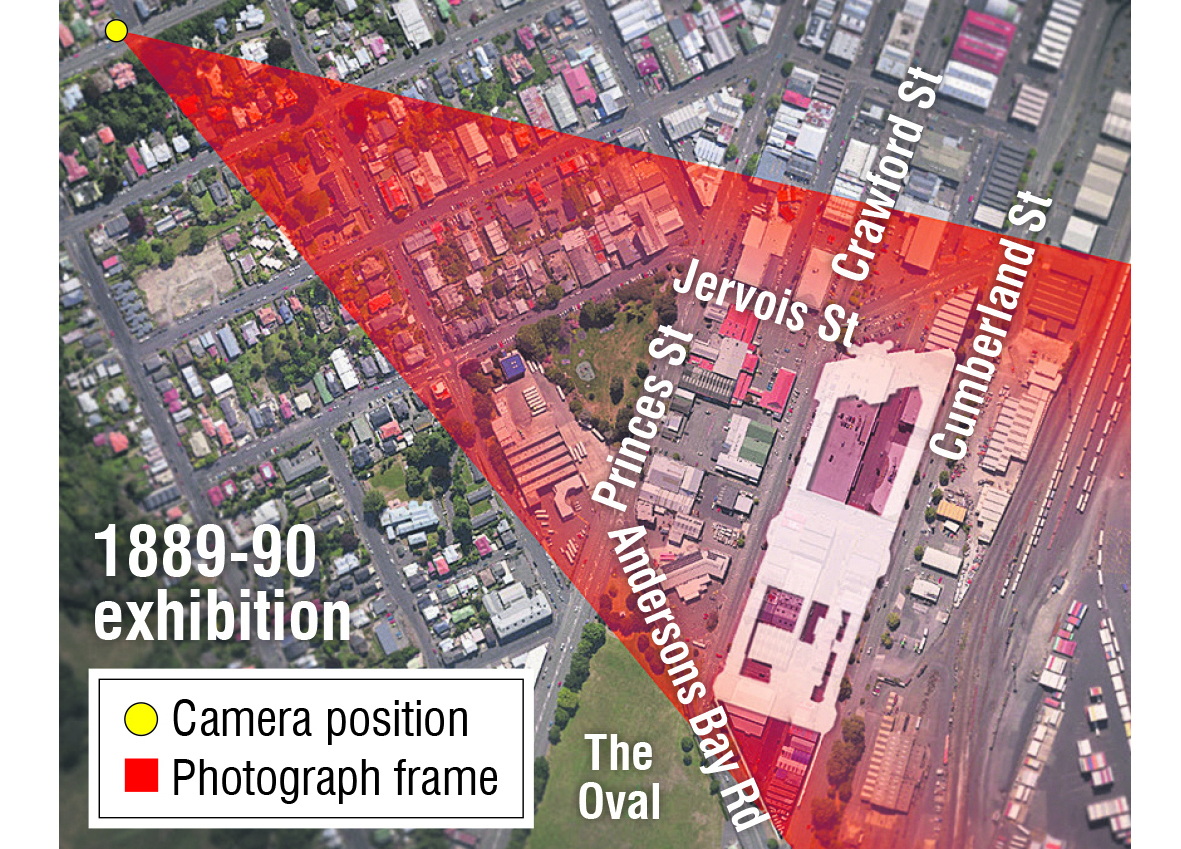
The exhibition site was located between Crawford St and Cumberland St, and Jervois St and Andersons Bay Rd.
Like the 1925-26 exhibition, it was built on land reclaimed from the harbour.
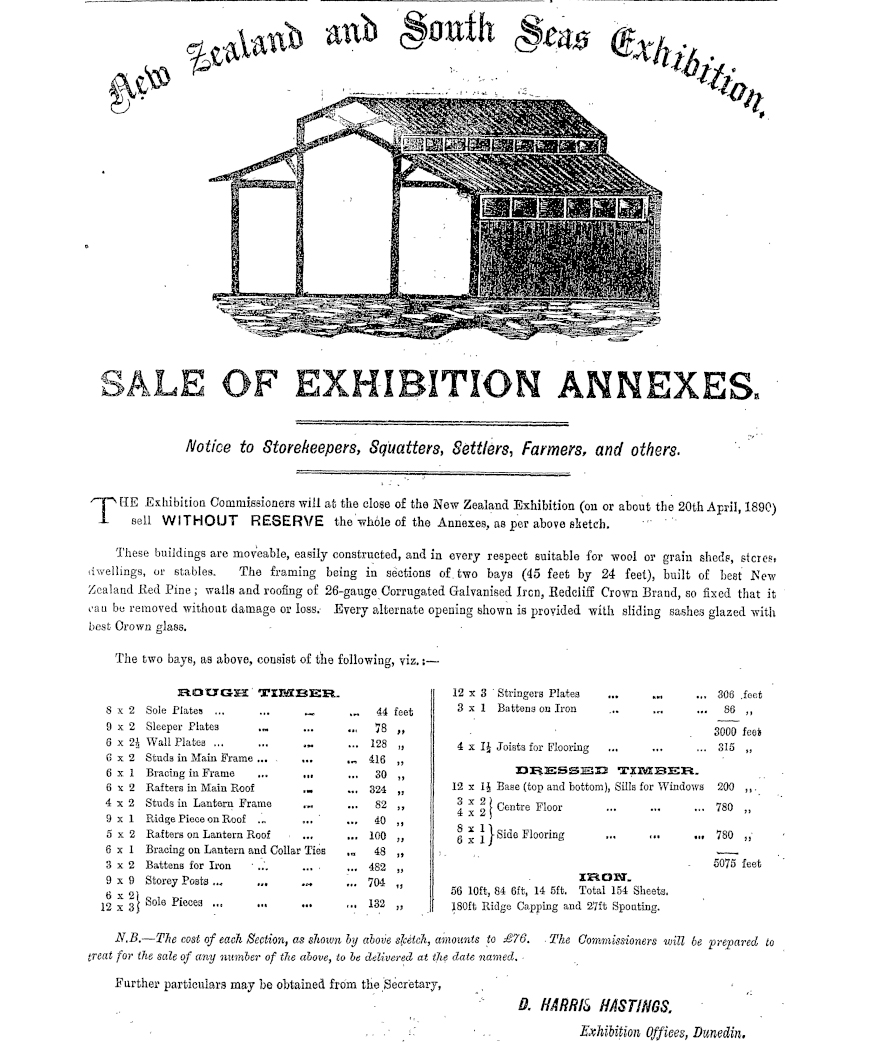
The exhibition’s financial success relied on, among other things, the sale of buildings, equipment and materials afterwards.
Exhibition architect James Hislop (1859-1904) designed buildings so they could be reused, easily dismantled and sometimes rebuilt elsewhere. Parts of buildings, and their materials, were sold far and wide.
This feature shows what happened to some of them.
Let's take a tour
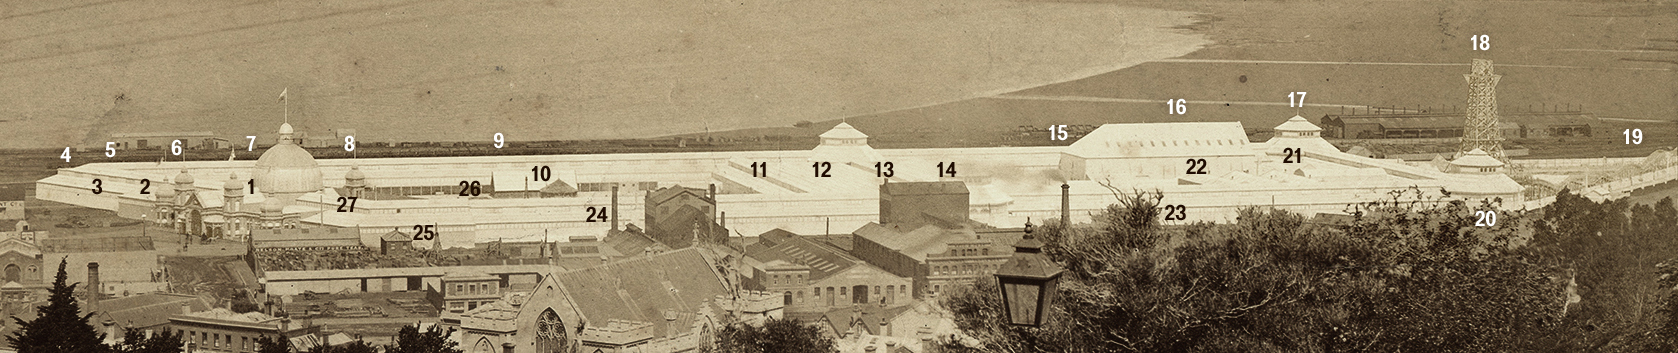
1. Main Building and Fernery
2. Armament Court
3. Auckland Court
4. Napier Court
5. Whanganui and New Plymouth Court
6. Wellington Court
7. Nelson Court
8. Westland Court
9. Canterbury Court.
10. ‘Māori House’
11. Education and Fisheries Court
12. Great Britain Court
13. Foreign Court
14. Machinery Court
15. Otago Court
16. Concert Hall
17. NZ Mineral Court (corner tower)
18. ‘Eiffel Tower’
19. Switchback Railway
20. NZ Govt. Public Works (corner tower)
21. Dining Room
22. Art Gallery
23. New South Wales
24. Victoria Court
25. South Seas Court
26. Garden
27. Māori and Early History Court
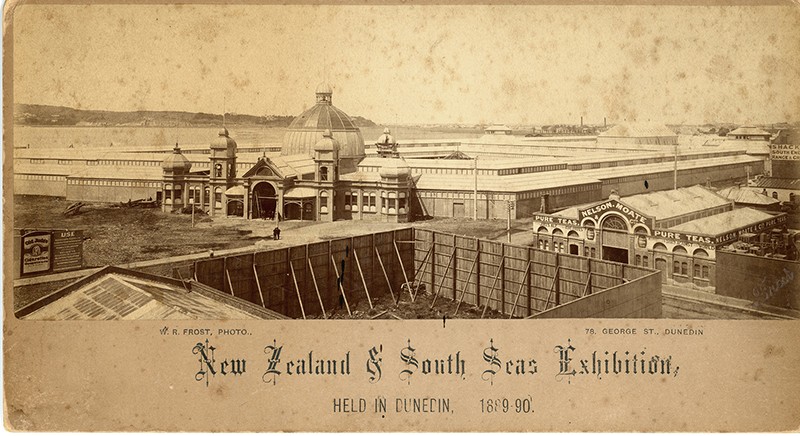
Photo: The 1889-90 New Zealand and South Seas Exhibition. W. R. Frost. Collection of Toitū Otago Settlers Museum (98_38).
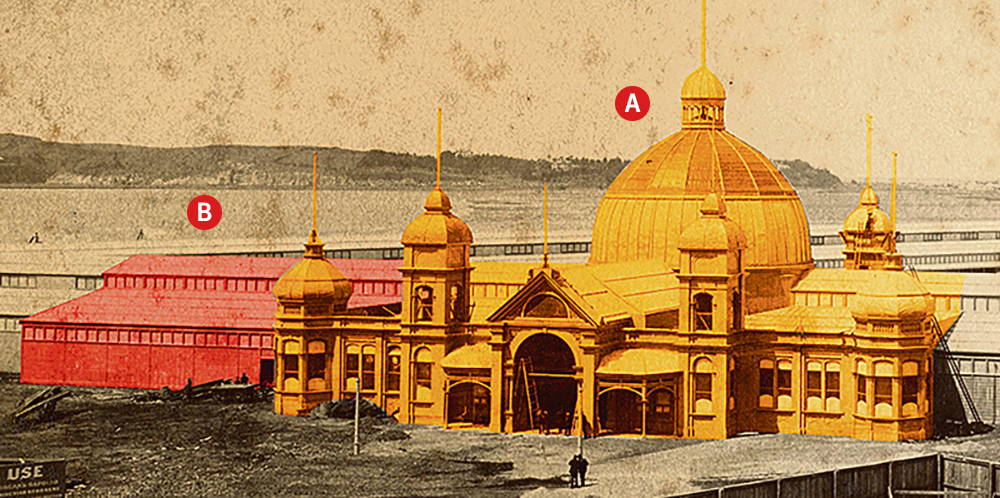
A
The Main Building (1, yellow building, above right) just before completion in 1889. It had a central hall under the 24m-high and 15m-diameter dome. After the exhibition closed it was intended for a working men’s college. This fell through and it was dismantled for materials in November 1890.
• Under the dome was a favourite meeting place. Image: Page 3 Advertisements Column 2. Evening Star, Issue 8191, 15 April 1890, Page 3

B
Highlighted above, the Armament Court (2, pictured above left, orange building). Unlike the other, corrugated iron clad annexes, this and the Māori and Early History (27) and South Seas (26) Courts were clad in weatherboards.
• The various exhibition courts were primarily housed in long timber-framed corrugated iron clad annexes (see advertisement below), each with a central pedestrian avenue and side aisles for exhibits.
Image: Otago Witness, Issue 1965, July 18, 1889, Page 19. paperspast.natlib.govt.nz/newspapers/ OW18890718.2.86.3
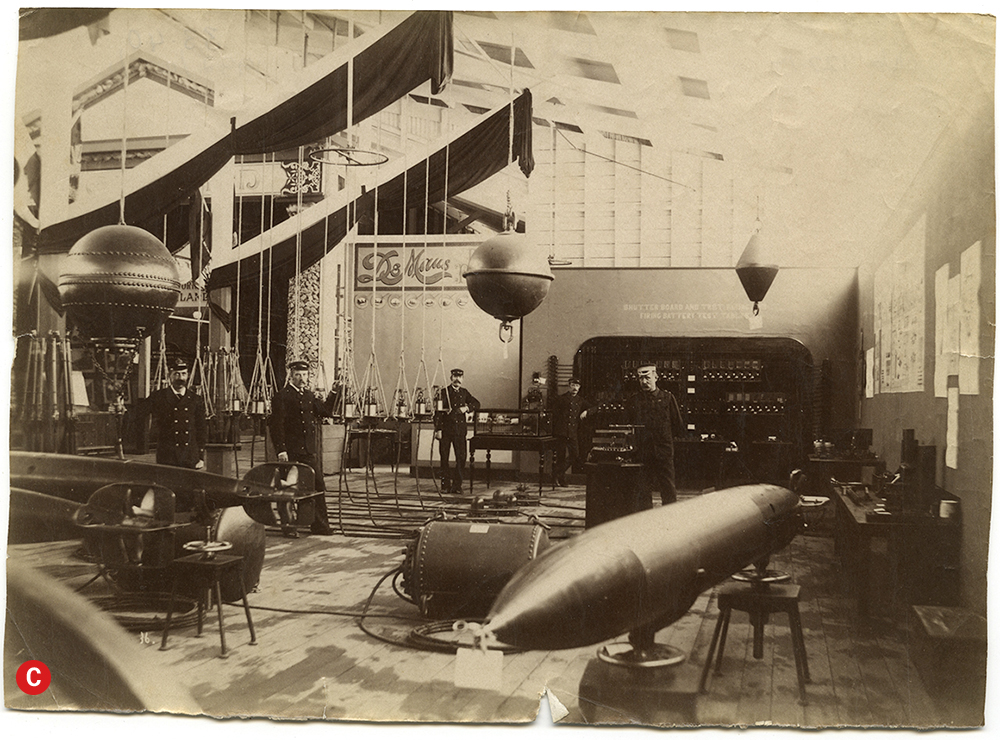 C
C
The photographic booth of David Alexander DeMaus (1847- 1925), the official photographer of the Exhibition and its visitors.
Photo: 1889-90 New Zealand and South Seas Exhibition, Dunedin. D. A. DeMaus. Collection of Toitū Otago Settlers Museum (98_47-1).
The Armament Court (2, below), looking east toward the Auckland Court (3).
 D
D
The Armament Court (2) was relocated to Speight’s Brewery, where it may have survived until a 1937 redevelopment.
Photo: Dunedin from Express Company’s new building, circa 1909, Dunedin, by Muir & Moodie. Te Papa (C.012371).
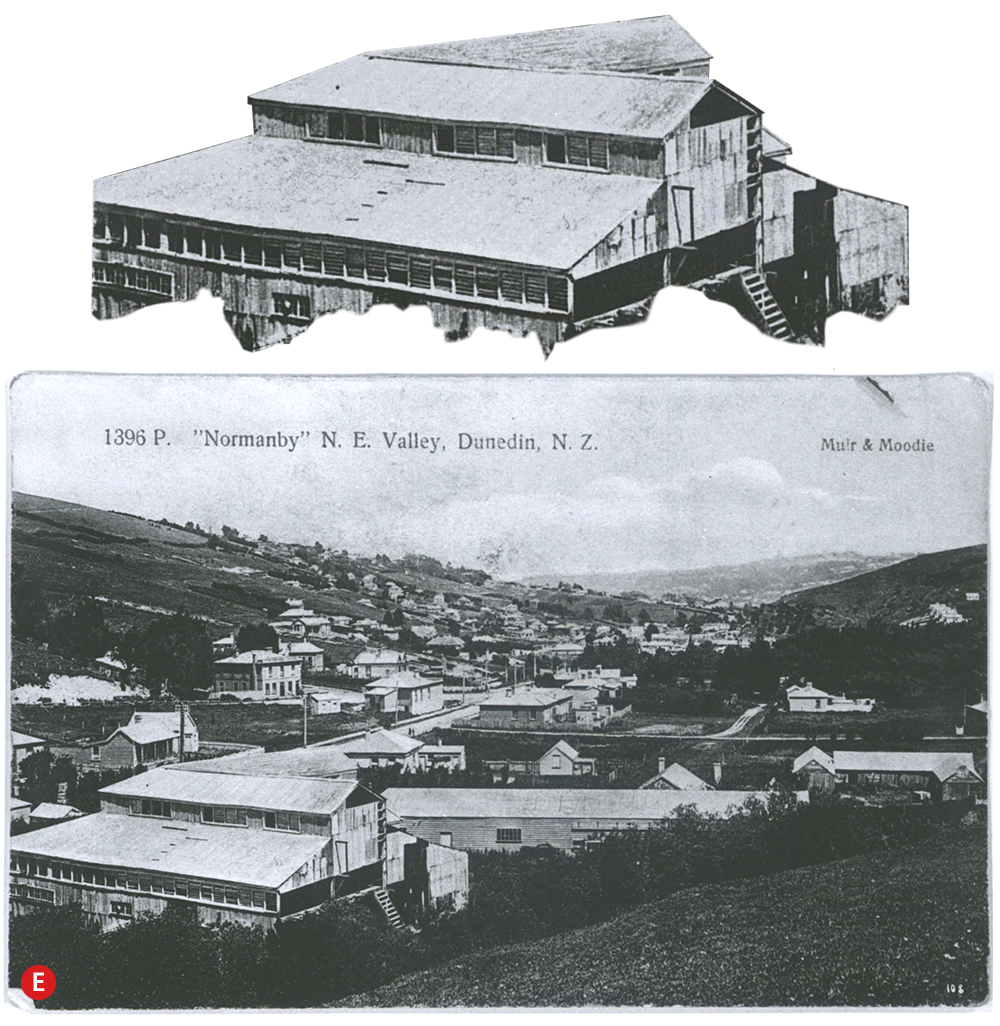
E
The tannery of Charles [1845-1914] and John [1849-1943] Coombs purchased an annexe section that had housed the Napier (4) and Whanganui/New Plymouth Courts (5), relocating it to Normanby.
Photo: 0933_01_044A.jpg. Hocken Digital Collections, hocken.recollect.co.nz/nodes/view/14603
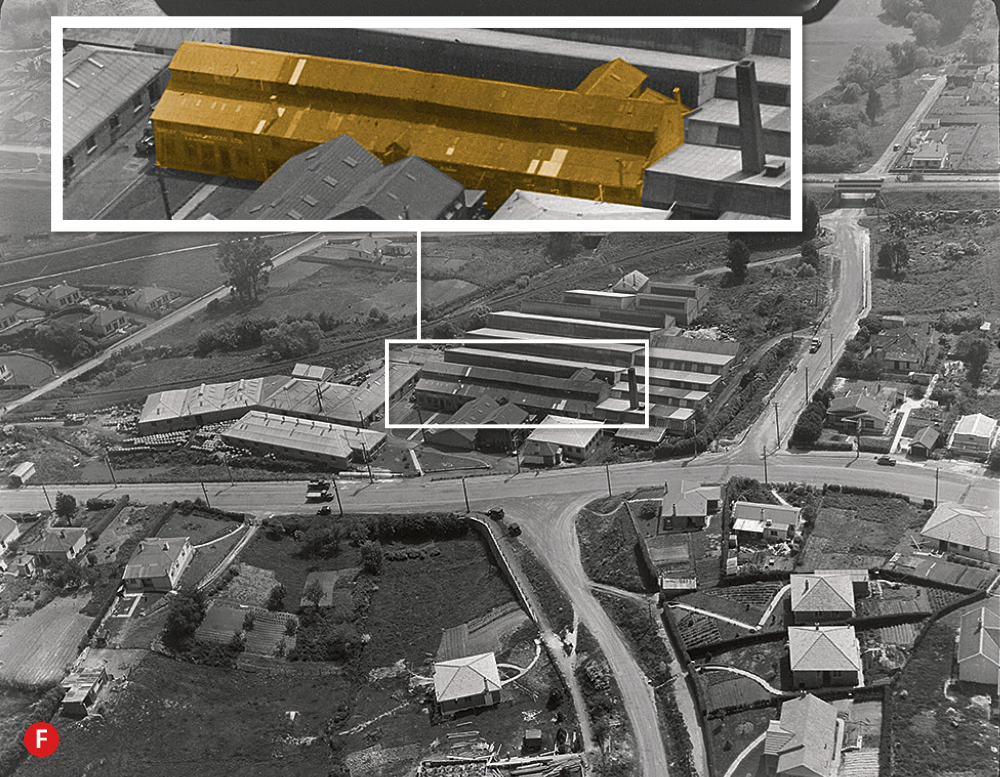
F
The tannery of J. Bayley and Co. (exhibitors) seen here in 1947, at Burnside, reused 10 bays (highlighted). The last part of these was demolished c.2010. Nearby, Kempthorne, Prosser & Co. Ltd, drug and fertiliser manufacturers (exhibitors), purchased eight bays of annexe for their Burnside Acid Works.
Photo: Bayley Tompkins Hedges Tannery, Green Island, Dunedin. Whites Aviation Ltd: Photographs. Ref: WA-10705-F. Alexander Turnbull Library, Wellington, New Zealand. /records/23047632
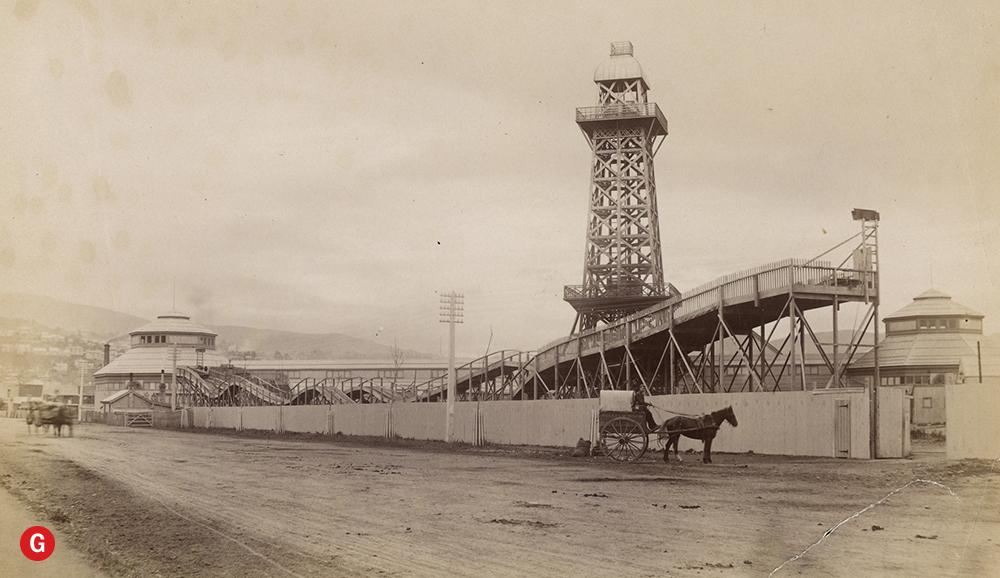
G
The southern end of the exhibition. The exhibition’s own timber “Eiffel Tower” (18) was 46m tall and had 7600m of red pine. It was sold to a Mr Gadfield and does not appear to have been reconstructed. In front, the Switchback Railway (19), a very popular exhibition attraction, was sold and relocated to the Caledonian Grounds (the second site, off Andersons Bay Rd).
It operated until early 1897, fell into disrepair and was removed in 1899. On the far left corner turret, the NZ Government Public Works Court (20) and in the far right turret, the NZ Minerals Court (17). One of these was sold to Dicksons of Kuri Bush, near Taieri Mouth, and used as a farm building. It slowly deteriorated, finally collapsing in strong winds in 2015.
Photo: De Maus, David Alexander, 1847-1925, Eiffel Tower and roller coaster (1889-1890). Hocken Digital Collections, hocken.recollect.co.nz/nodes/view/69781
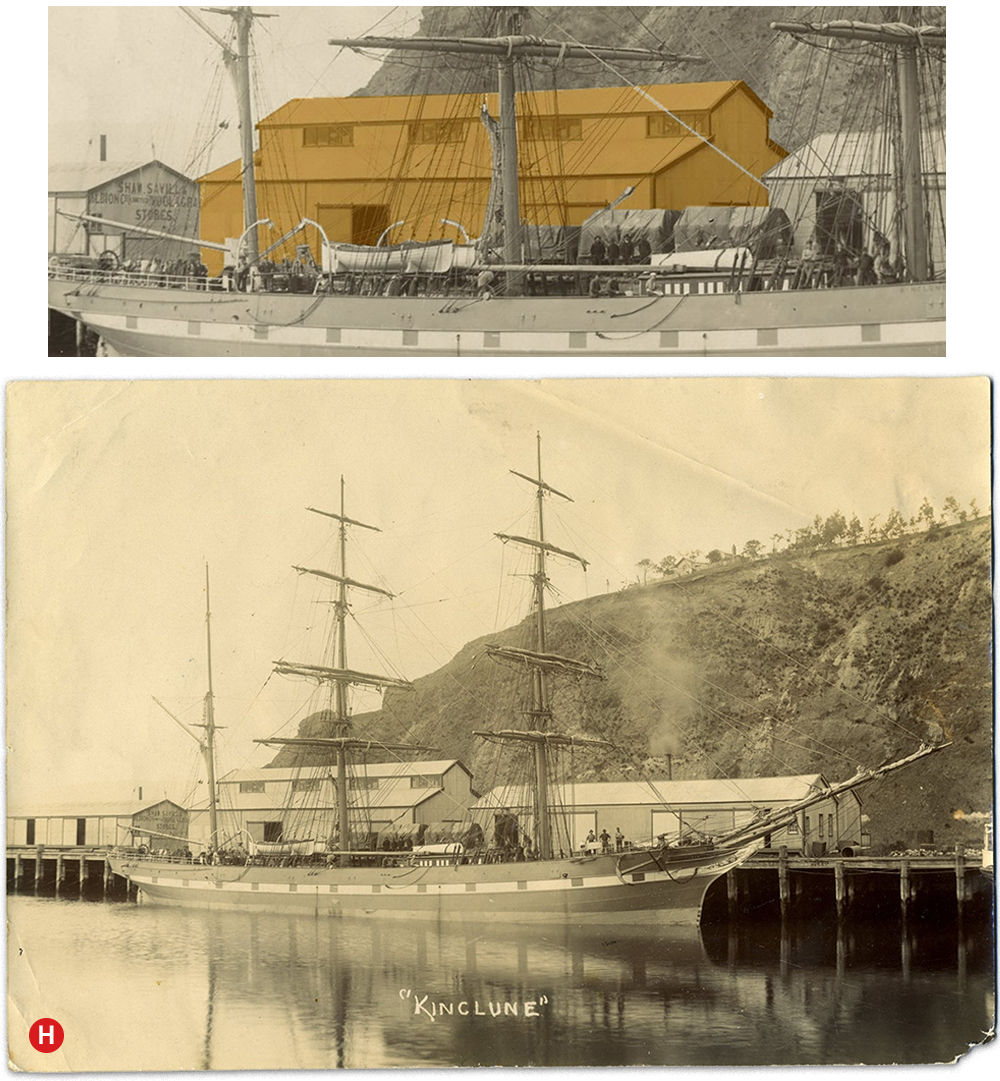
H
Four annexe bays became stores for the Shaw, Savill and Albion [shipping] Line (exhibitors) in Port Chalmers, demolished 1955-56.
Photo: Kinclune at Port Chalmers. Collection of Toitū Otago Settlers Museum (2_76-1).
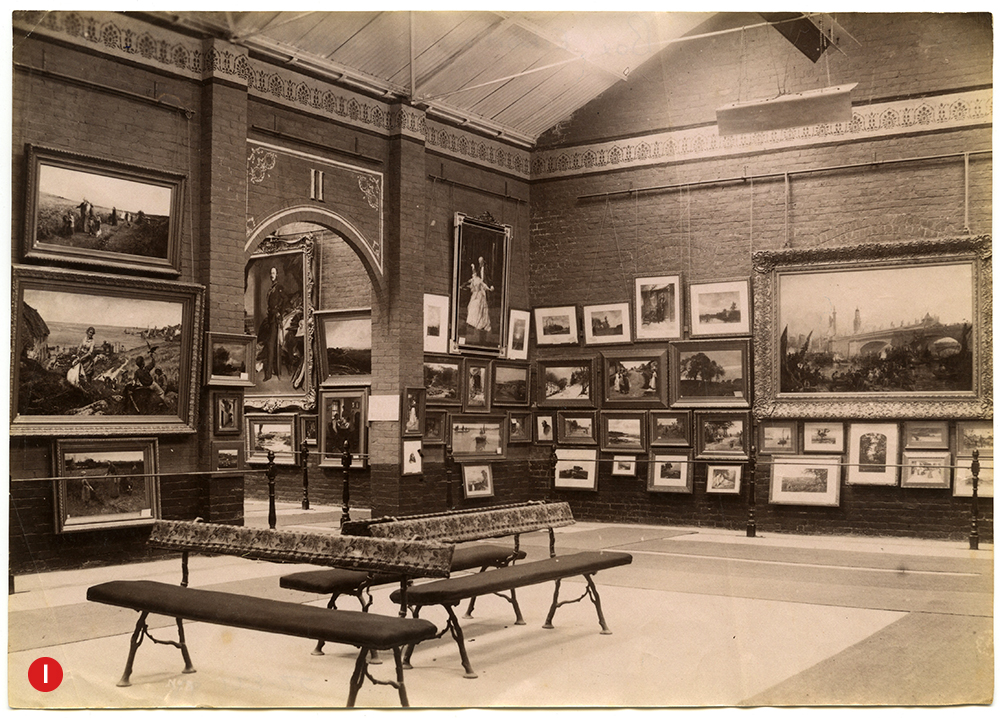
I
The exhibition Art Gallery (22) was built of brick for fire resistance.
Photo: 1889-90 New Zealand and South Seas Exhibition, Dunedin. D.A. DeMaus. Collection of Toitū Otago Settlers Museum (90_60-1).
J
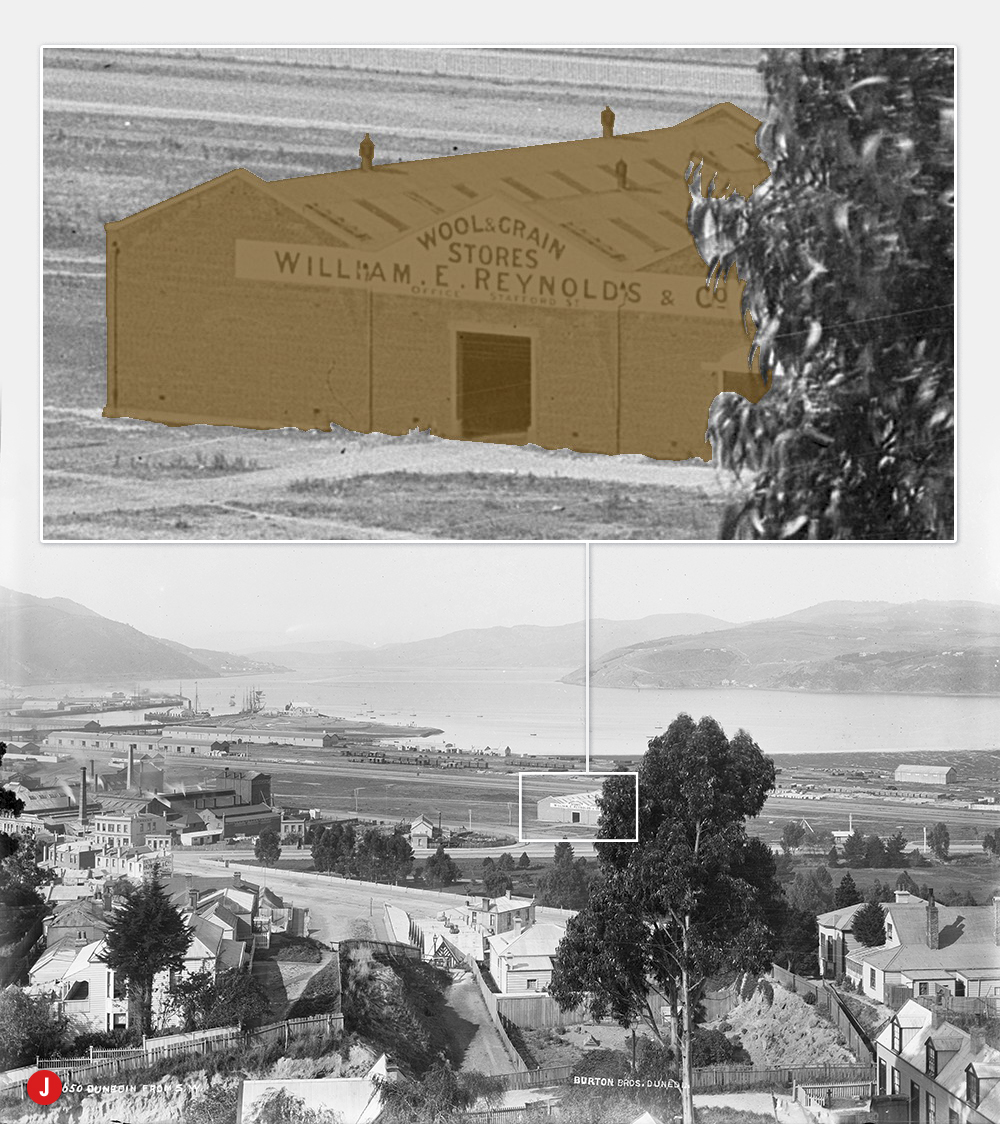
Hislop designed the Art Gallery (22) building to be adapted. Here it is, c.1891, converted into wool and grain stores for William E. Reynolds and Co.
Photo: Dunedin from south west, Dunedin, by Burton Brothers. Te Papa (C.012098)
K
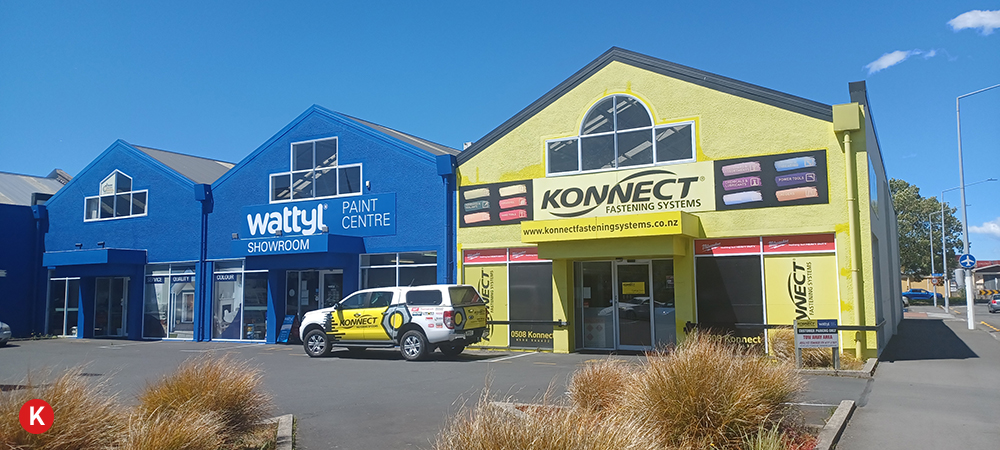
Like the 1925-26 Art Gallery, the 1889-90 gallery (22) still exists today.
Photo: Heritage Reconnaissance, 2025.
L
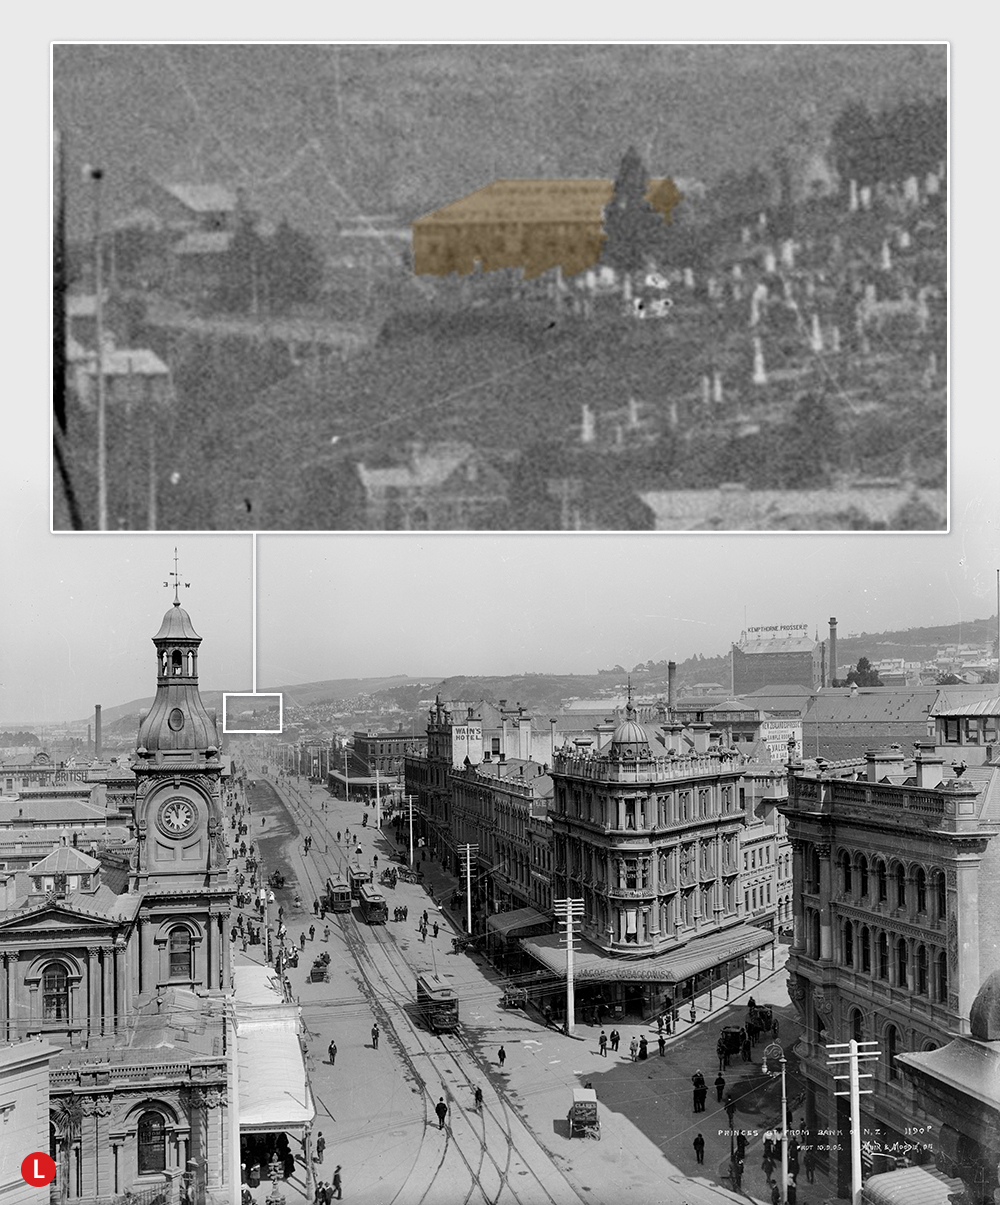
A distant view of the former exhibition Dining Room (21) being reused as the boot factory of Robert (1837-1907) and Helen (nee Corkler, 1834-1904) McKinlay. It was demolished in 1930.
Photo: Princes St from Bank of New Zealand, circa 1905, Dunedin, by Muir & Moodie. Te Papa (C.011879)
M
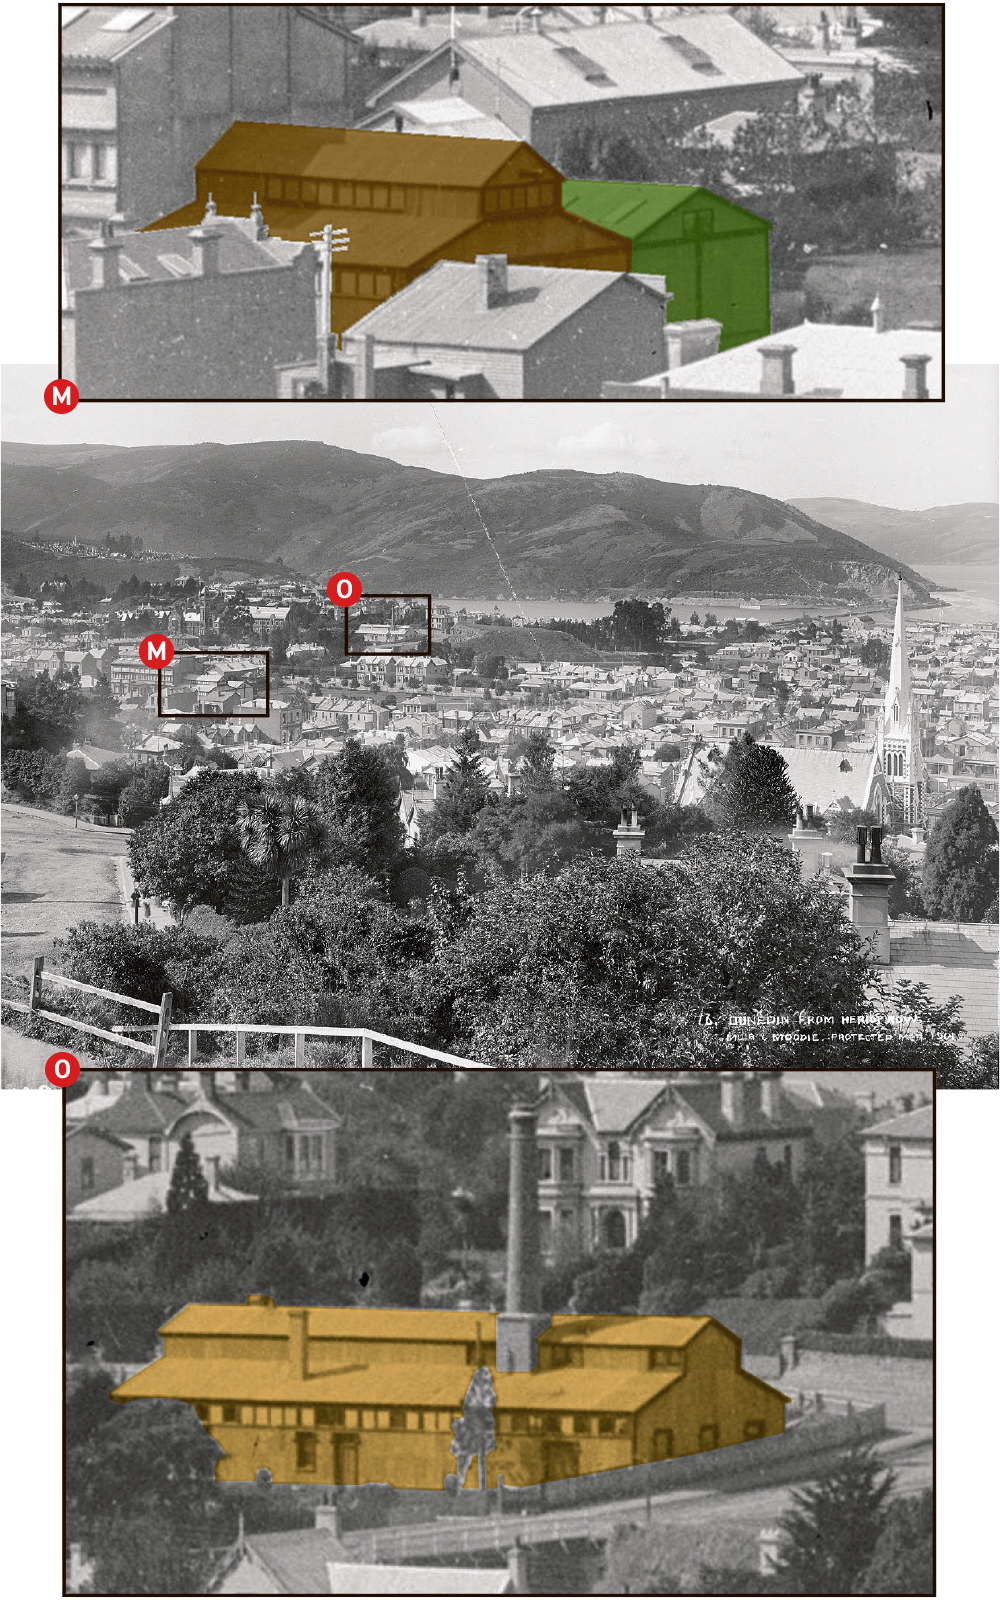
Part of the former Education Court, repurposed as an annexe to Otago Museum. The front section (highlighted in brown) housed technological and ethnological collections from the museum and those acquired from the exhibition.
The rear section (highlighted in green) performed poorly as the Dunedin Public Art Gallery (see below) until the completion of the new public art gallery in 1907.These buildings were demolished in 1924.
Photo: Dunedin from Heriot Row, circa 1901, Dunedin, by Muir & Moodie. Te Papa (C.012050)
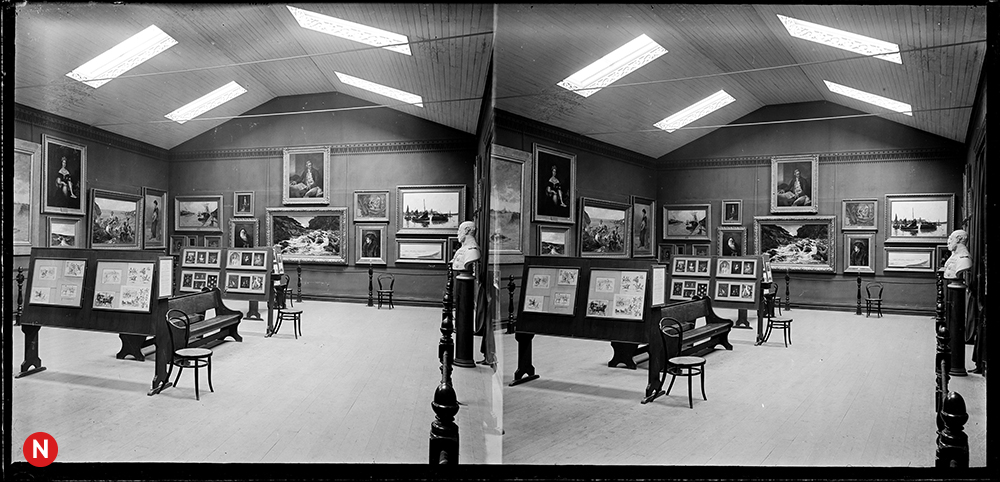
N
The interior of the Dunedin Public Art Gallery when it was located in the Museum Annexe between 1891 and 1907.
Photo: Williams, Edgar Richard, 1891-1983: Photographs and papers. Ref: 1/2- 140665-G. Alexander Turnbull Library, Wellington, New Zealand. /records/23024326]
O
Five annexe bays were relocated to house the University of Otago School of Mines. A new school of mines was completed in 1909 and in 1911 the southern end of this “old tin shed” was demolished. The northern end was refurbished and was the first home for the home science school before demolition in 1920.
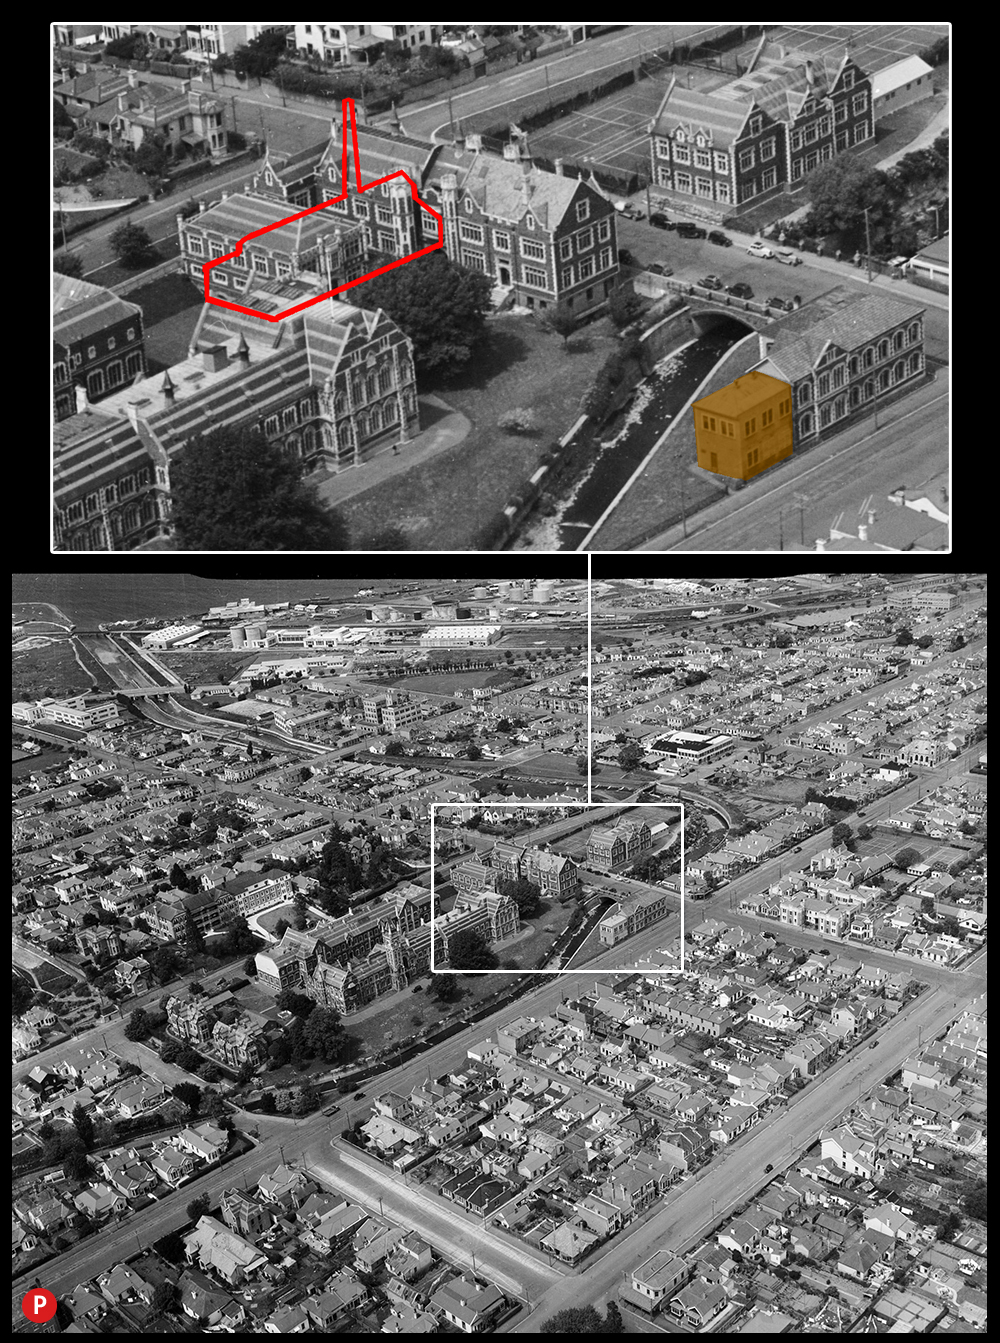
P
Corrugated iron from the ‘old tin shed’ (pictured above, outlined in red) may have been reused in the construction of a temporary extension (above, highlighted in brown) to the then Dental School, now the University of Otago Staff Club.
Photo: Otago University, Dunedin. Whites Aviation Ltd: Photographs. Ref: WA10707-F. Alexander Turnbull Library, Wellington, New Zealand. /records/22874587
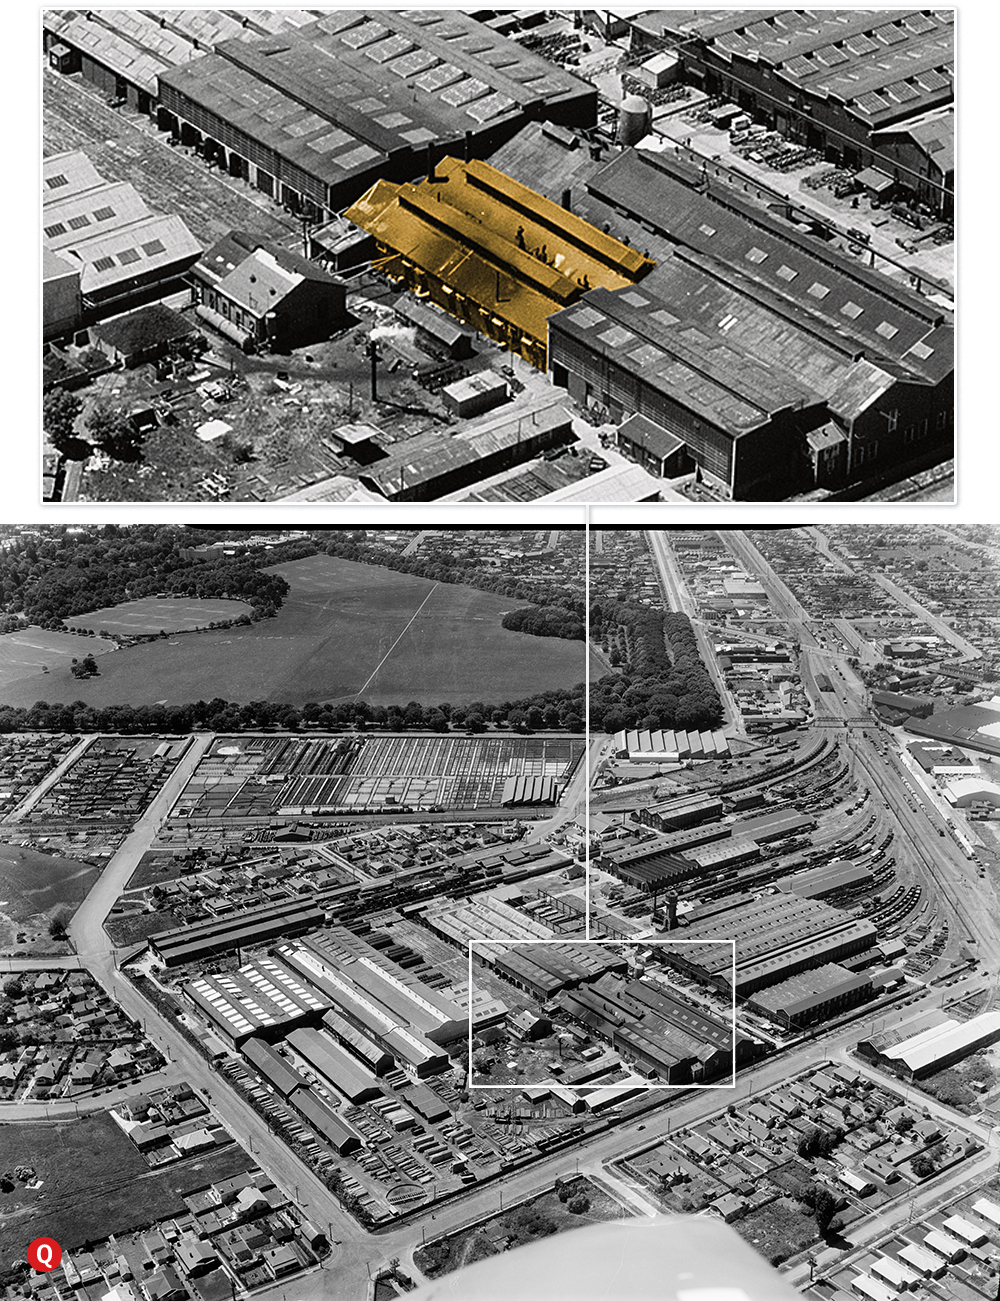
Q
Four annexe bays made it all the way to the Addington railway yards to be adapted as stores (pictured above, highlighted in brown).
Photo: Addington Railway, Christchurch. Whites Aviation Ltd: Photographs. Ref: WA-10863-F. Alexander Turnbull Library, Wellington, New Zealand. /records/22715646


