Winter is here but the weather still seems to be making up its mind. Some days feel like autumn so eat with a lighter touch rather than succumbing to the obvious charms of comfort food, chef Bevan Smith writes.
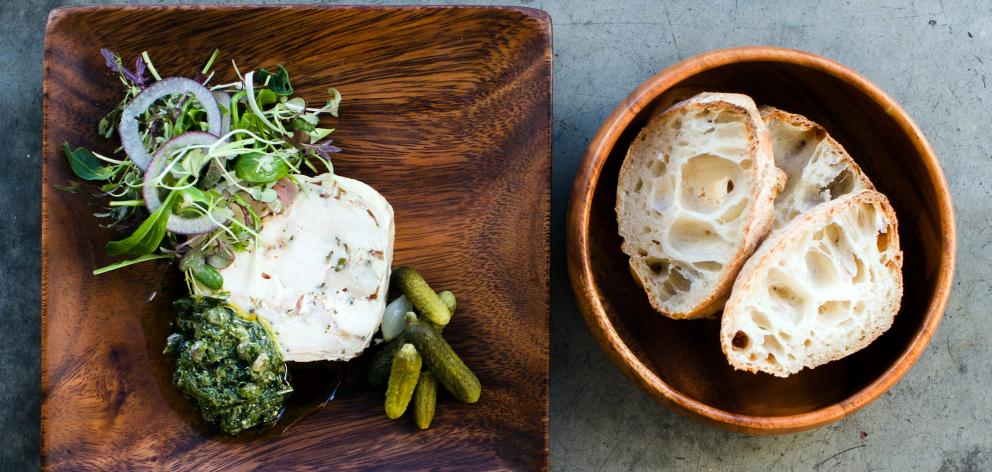
This chicken and garlic terrine is a recipe that I brought back from my time in Australia under Phillip Johnson. It's a classic. Straightforward and understated in appearance it utterly delivers when it matters.
Swap the salsa verde for a hearty chutney if the herbs are in short supply. Nevertheless, a magnificent lunch will be in hand or a stylish start to dinner.
Made ahead of time, it keeps well undisturbed. If removing the skin seems tricky, try smiling nicely at your butcher.
Pumpkin is pretty much a given at this time of year and butternut is a favourite of many.
Roasted and given the treatment with tahini, yoghurt and dukkah, it's hard to think of a healthier start to the day, lunch on the go or part of a wider meal.
Echoes of faraway warmer climes, I could go on.
As I am a fan of both venison and Thai food, it was inevitable I suppose that the two would eventually meet.
Classic massaman curry is rich and satisfying. Often made with beef, it also works a treat with venison and the cheaper shoulder cuts are perfect for this dish.
Don't be off put by the number of ingredients; it really is a simple dish at heart. Redolent and delicious, this is food made with love and not for the rushed.
Good enough reason to stay in, take the time and treat yourself. Happy cooking.
-Chef, restaurateur, author and father of two, Bevan Smith is the owner of the award-winning Riverstone Kitchen, north of Oamaru. His life revolves around food. Sharing that passion is central to his philosophy that all people should and can eat well.
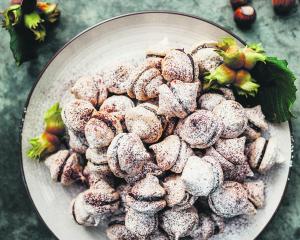
 Photos: Emma Willetts
Chicken and garlic terrine with cornichons and salsa verde
Photos: Emma Willetts
Chicken and garlic terrine with cornichons and salsa verde
Serves 8-10
Ingredients
2 size 14 free-range chickens
4 cloves crushed garlic
1½ tbsp finely chopped thyme
zest of 2 lemons
salt and pepper
cornichons
Salsa verde
Makes ½ a cup
½ clove garlic
2 tsp baby capers, rinsed and drained
2 anchovies, roughly chopped
½ teaspoon flaky sea salt
1 cup mint leaves, picked
1 cup flat leaf parsley leaves, picked
⅓ cup extra virgin olive oil
2 tsp quality red wine vinegar
1 tsp Dijon mustard
Method
Preheat oven to 200degC. Carefully remove the skin from each chicken in one piece and use it to line a terrine mould or loaf tin with some of the skin draping over the sides.
Remove and dice the meat from the chicken and place it into a bowl with the garlic, thyme, lemon zest and a healthy dash of salt and pepper.
Mix the filling together and place into the lined terrine mould ensuring there are no air pockets.
Fold the remaining skin over to cover the top of the filling and tuck any excess down into the sides of the terrine or trim with a sharp knife.
Place the lid of the terrine mould on top (or seal with a piece of tinfoil) and place in a roasting tray with 1cm of boiling water in the bottom.
Cover the entire roasting dish with a piece of tinfoil, sealing the edges tightly before placing in the oven.
Bake for 40 minutes before checking the temperature of the terrine with a thermometer. Do this by removing the terrine from the oven and pushing the tip of the thermometer into the centre of the terrine to give an accurate reading.
The minimum temperature you want is 65degC, so the terrine will be safely cooked, yet nice and moist. Maximum is 72degC - anything above this and the terrine will be drier than it needs to be.
If the temperature is under 65degC, then place back into the oven and continue to cook until the temperature is reached.
When ready, remove from the oven and allow to completely cool in the mould before refrigerating.
When ready to serve, remove terrine from the mould and cut into 8-10 slices with a sharp knife. Serve with cornichons, salsa verde and toast.
Terrine keeps for up to 10-12 days in the fridge untouched.
Salsa verde
Place garlic, capers, anchovies and salt into a mortar and pestle and grind to a paste.
Add mint and flat-leaf parsley and grind until smooth.
Add olive oil and muddle with the pestle. Mix in vinegar and mustard and reserve for later use.
Keeps for up to 2 days.
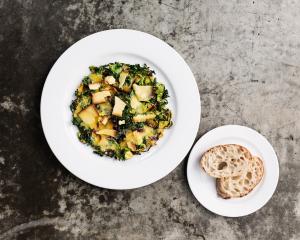
 Butternut pumpkin with tahini, yoghurt and dukkah
Serves 2
Ingredients
½ small butternut pumpkin
salt and pepper
2 Tbsp olive oil
1 tsp ground cumin
1 cup natural yoghurt
1 Tbsp tahini paste
½ tsp crushed garlic
2-3 Tbsp dukkah (see below)
¼ cup chickpeas, cooked and drained
½ cup salad greens, optional
extra virgin olive oil
Dukkah - Makes a cup and a bit
⅔ cup roast hazelnuts
⅓ cup sesame seeds
3 tbsp coriander seeds
2 tbsp cumin seeds
1 Tbsp olive oil
Method
Preheat oven to 200degC. Remove the skin and any seeds from the pumpkin before cutting the flesh into 1cm thick slices.
Place pumpkin on to a baking paper lined oven tray, drizzle with olive oil and season with cumin and salt and pepper.
Place in oven and roast for 30-40 minutes until cooked and tender.
Remove from oven and keep to one side.
In the meantime, mix the yoghurt, tahini and garlic together until well combined and season to taste. Spread the yoghurt over the plates or plate you wish to serve on.
Place the hot pumpkin on top.
Spoon over the dukkah and finish with the chickpeas, salad greens and a lash of extra virgin olive oil.
Serve as a side to lamb, fish or poultry or add poached eggs for a healthy breakfast or light lunch.
Dukkah
Preheat oven to 200degC.
Place hazelnuts and seeds into a spice or coffee grinder and blitz until a semi-coarse texture. Place on an oven tray and drizzle with the olive oil.
Toast dukkah in the oven until fragrant and lightly coloured.
Remove from oven and allow to cool before storing in an airtight container until ready to use. Keeps for several weeks.
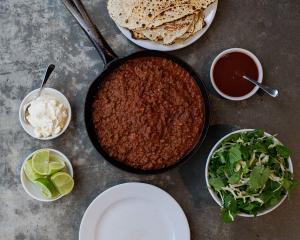
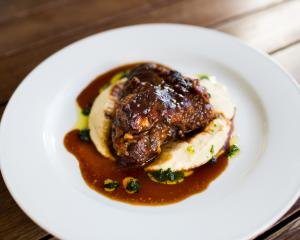
 Massaman curry of venison with roast cauliflower, peanuts and rice crisps
Serves 4
Ingredients
600g diced venison shoulder
4 cups coconut cream
1 small cauliflower
vegetable oil
rice paper wrappers, optional
curry paste (see below)
3 Tbsp finely chopped fresh ginger
¼ cup roasted blanched peanuts
small piece cinnamon stick
2 Tbsp sugar
2 Tbsp fish sauce
4 Tbsp tamarind water
Asian salad greens
Curry paste
½ tsp chilli flakes (¼ tsp if you prefer a milder curry)
large pinch salt
5 cloves, roasted
7 cardamom pods, roasted, husks discarded and seeds ground
3 bay leaves, roasted
½ cup desiccated coconut, roasted
½ cup peanuts, roasted
Method
Place the diced venison and the coconut cream in a large pot and bring to a simmer stirring occasionally.
Continue to simmer, toping up with a splash of water if need be, for up to 2 hours or until the venison is very tender. Remove from the heat, drain and reserve the braising liquid from the venison.
Meanwhile, preheat an oven to 200degC. Slice the cauliflower into 1cm pieces and place on a baking paper-lined oven tray.
Drizzle with a little vegetable oil and roast for 30 minutes or until the cauliflower is well coloured and tender when tested with the tip of a sharp knife. Remove the cauliflower from the oven and keep to one side until ready to use.
If making rice paper crisps, place 2-3 cm of vegetable oil into the bottom of a medium sized pot and heat to 170degC. Test with a heatproof thermometer.
Cook rice paper sheets one at a time turning over to ensure they are cooked on both sides. They only take a few seconds but take care as the oil may spit. Drain cooked crisps on absorbent paper and reserve or store for several days in an airtight container.
Add paste to the venison along with the ginger, remaining peanuts and cinnamon. Over a moderate heat stirring regularly, gently cook the paste until fragrant. Add braising liquor and season with sugar, fish sauce and tamarind water. Adjust seasoning to taste with a little more fish sauce or tamarind water.
Reheat cauliflower for a few minutes in the oven.
Serve venison curry either with or separately to the cauliflower, whatever takes your fancy, along with the rice crisps and salad greens. Also fabulous with steamed greens.
Serve immediately.
Curry paste
Make the paste by either blitzing in a blender with a little water to allow the paste to move or the old-fashioned way in a mortar and pestle until as smooth as possible.
Paste is best used on the same day it's made.