Not content to just make these cakes, Gee is sharing tips and secrets to creating them in her latest book, Magnolia Kitchen Design.
“I like sharing this with people.”

“It’s really rewarding to know I’ve done this all off my own bat.”
Gee is inspired to create often when she sees the latest seasonal produce and feels she wants to create something with it, like her rosemary and plum cake or her Earl Grey cake, even if the idea seems a bit unusual.
She has an “unwavering faith” that she can make things up and they will work out.
“It’s worked so far.”
If things do go wrong, she sees them as learning opportunities and a chance to improve her techniques.
Gee advises all those budding cake-makers out there to find a niche, one that feeds their passion, rather than jumping on the bandwagon of the latest trend.
“That way you’ll get more enjoyment and people will gravitate more towards your work, as they’ll see the creativity and passion.”
She also advises bakers to register their kitchens - she learnt the hard way. They need to realise it’s going to be hard work juggling business and baking and focus on the customers’ reaction to the cake, not their own critical thoughts.
Gee has also learnt that despite it being very stressful, leaving things until the last minute works for her.
“I know I can do my best work under pressure. In that last minute of hustle and bustle, I can really pull out the wow.”

Mini tarts
These little single-mouthful delights are perfect for events where you want to have a spread of desserts, such as a wedding dessert table.
You can add an edible flower to decorate, grab your kitchen flame-thrower and toast the meringue, or just use a touch of gold leaf for elegance.
The filling options are endless - try my suggestions below or come up with your own. You could use dark chocolate ganache, salted caramel ganache, plum compote, custard...
MAKES 15-20 MINI TARTS
Filling & topping 1 hour
Dough prep 15 minutes
Baking 14 minutes
Chill 30 minutes
Tart cases
250g butter, at room temperature
70g icing sugar
½ teaspoon vanilla extract
1 tsp vanilla bean paste (equivalent to 1 vanilla pod, scraped)
70g cornflour (cornstarch)
260g plain flour
Meringue topping
100g egg whites
200g caster sugar
Filling options
Lime curd or Earl Grey ganache or spiced caramel - or any other filling you like
Method
Heat your oven to 150degC.
Prepare your tart tray - I use the term “tart tray” loosely, as I actually use a mini cupcake tray. For reference, the diameter for each tart is 5.5cm at the top and 3.5cm at the bottom. Grease the tray holes with cooking spray, then dust with flour, tip the tray upside down and give it a shake/bang to remove any excess flour.
Beat that butter with an electric mixer and the beater attachment until it’s soft and fluffy and has lightened in colour by a couple of shades.
Turn off your mixer and sieve in your icing sugar, then add both your vanillas and turn your mixer on slow until the icing sugar is incorporated with the butter. Once it is incorporated, you can turn the mixer up and give it another good beat. Don’t just go straight in with your mixer on high - you will get a face full of icing sugar!
Turn the mixer off again and add the cornflour and plain flour, then mix on low until combined.
Using a mini cookie scoop, portion your dough into your tart tray. If you have a tart tamper, then flour it and squish your dough into the tray holes. These tarts don’t need to be perfect, so you can use your thumb to squish the dough in. Push it slightly up the sides of the tray holes and make the top edges semi-even.
Using a fork, give the bottom of each tart a wee stab and place the tray in your preheated oven. Bake for about 14 minutes — you don’t want to brown these, you just want to cook them enough so they hold their shape once they’ve cooled.
Remove from the oven and allow to cool in the tray for about 5 minutes, then chill in the fridge for 20-30 minutes. This will make them easier to remove from the tray. I usually place a finger inside each case and gently turn it in the tray . . . when it turns, I then pull up and it should slide straight out.
Once you have removed all the cases, set them aside and prepare your fillings. I have prepared lime curd for a Key lime pie-inspired tart, Earl Grey ganache and spiced caramel.
Once you have your desired filling, fill the cases to just below the top to allow for the meringue topping. Don’t overfill or you’ll have a messy overflowing situation on your hands.

To make the meringue topping
Place the egg whites and sugar in a heatproof bowl (I do this in my mixer bowl, to save on dishes). Grab a pot that your bowl can rest comfortably on top of. Fill the pot halfway up with water, bring it to the boil then turn down to a simmer.
Put a large spoon in the pot so that steam can escape between the bowl and the pot, then rest your bowl on top of the pot. Stir the mixture in the bowl until the sugar has dissolved into the egg white. To test this, dunk in your thumb and index finger and rub them together — if it feels gritty then leave on the heat longer, if it’s smooth then the sugar has dissolved.
Once the sugar is dissolved, transfer to your mixer bowl if you’re not already using it. Mix on high using your whisk attachment until stiff peaks are achieved and your bowl will now be cool to the touch.
Fit a piping bag with a French star tip with an opening size of about 1.5cm. Transfer your meringue into the piping bag and pipe dollops on to your filled tarts. You can serve these tarts with fresh meringue or you can toasty it up!
Earl Grey cake
This cake is such an understated flavour, but it’s one I find myself indulging in more often than not. I love to educate on flavours that aren’t as generic as basic chocolate or vanilla. If this cake were a lady, she would be classy and be at the races wearing a custom pillbox hat with florals on it.
SERVES 18
Makes 3 x 18cm round cakes
Prep 1½ hours
Baking 30-40 minutes
Chill 2 hours
370g milk
4 Earl Grey tea bags
500g plain flour
100g cornflour (cornstarch)
425g caster sugar
35g baking powder
285g butter, at room temperature
5 whole eggs
50g canola oil
1½ teaspoons vanilla extract
To decorate
1.5kg Earl Grey ganache, 1:4 ratio
Method
Heat your oven to 170degC.
Prepare three 18cm cake tins with cooking spray and line them with baking paper.
Put your milk in a pot, place it over a medium-low heat and bring to an only-just boil which, of course, is a made-up Bets-ism. What I mean is that you want your milk to be boiling hot but you don’t want it to go all manic and boil over, which it will if you don’t remove it from the heat as soon as you see a few little bubbles appear.
Remove the pot from the heat and add your tea bags, then leave to steep for approx 1 hour. You really want the milk to have a decent strong dark caramel colour to show the Earl Grey flavour is really infused through.
After your tea has been steeping for about 50 minutes you can start prepping your other ingredients.
Place all the dry ingredients in the bowl of a stand mixer fitted with the paddle attachment and mix on low speed to combine.
Chop your butter into cubes, add it to the dry ingredients and keep mixing on low until the mixture resembles breadcrumbs.
In a separate bowl, mix together the wet ingredients, including your infused milk . . . do I need to tell you to remove the tea bags?? REMOVE THE TEA BAGS FROM THE MILK, then mix the wet ingredients until combined.
Add two-thirds of the wet mixture to the dry ingredients and mix on medium-high until thick and fluffy - this step is important for the finished product, so take your fluffiness seriously. Add the remaining wet ingredients and mix well until combined and fluffy.
Scoop the mixture evenly into the prepared tins, using scales to get them all the same.
Now bake for 30-40 mins until the cakes are golden brown and when you poke a skewer or knitting needle into them it comes out clean.
Allow to cool in the tins for 5-10 mins, then turn out on to cooling racks.
When the cakes are cool, wrap them in plastic wrap and chill for 2 hours (or overnight) this will make them easier to trim and ice.
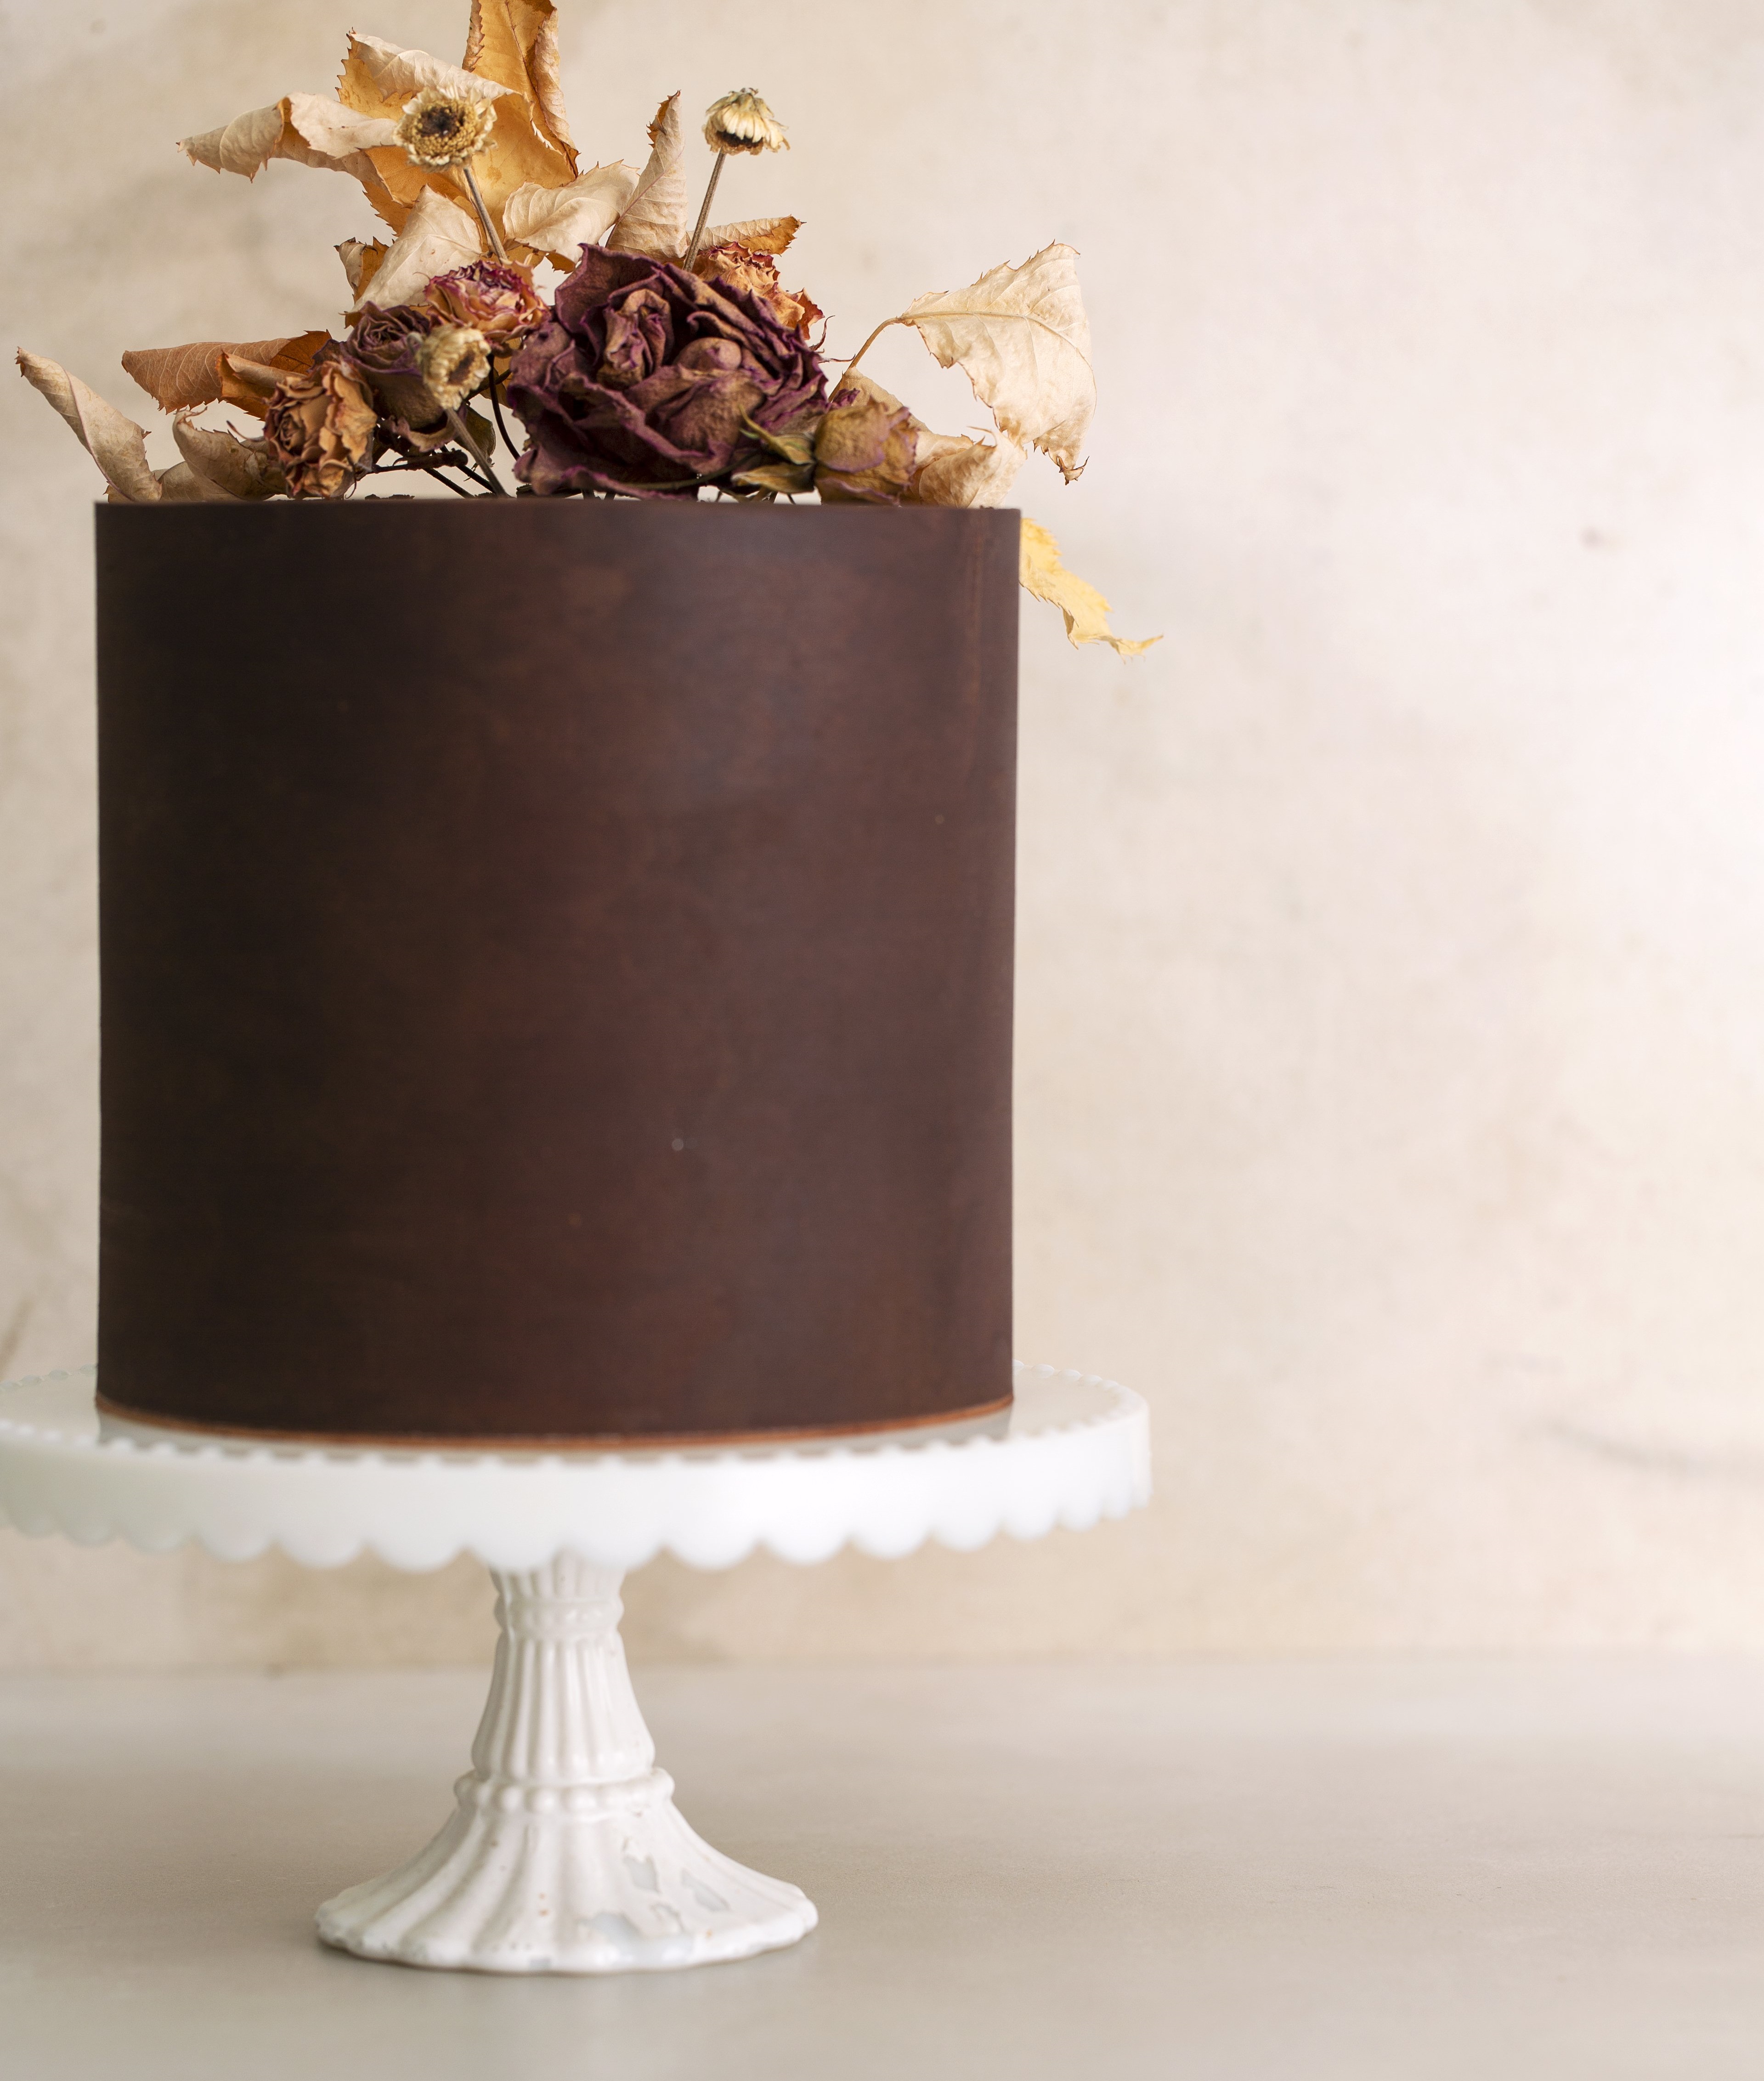
I have iced this with my Earl Grey ganache and decorated it with some dried roses and leaves.

Earl Grey ganache
Y’all know I love a good coffee, but did you know I am also a tea tippler? Often my husband and I will be sitting on the couch at night and I’ll just say “ttteeeeaaaaa” meaningfully to seemingly no-one. This has come to mean, “Babe, can you make me a tea?”
Anyway, this ganache is such a GREAT combo and one that is a little more left-field than, say, a more common espresso chocolate combo.
Trust me when I say that the way the dark chocolate brings out the flavour profiles hints of black tea, a touch of floral and bergamot is magical.
MAKES 535g (for a 1:3 ratio)
Prep 20-30 minutes
Setting 4 hours or overnight
135g cream
3 Earl Grey tea bags or 3 Tbsp Earl Grey loose tea
400g chopped dark chocolate
Method
Weigh your cream into your pot and add your tea bags or loose tea. Heat the cream on your stove top until it starts to bubble around the edges of the pot - you only want a slow boil, so keep an eye on it.
For a normal ganache you would remove the cream from the heat at this point, but we want to really infuse the Earl Grey into the cream, so keep it on a low heat without letting it boil for approx 20 mins.
While the cream is infusing, put your chocolate in a microwave-safe bowl. When your cream is looking like a milky weak tea (light caramel colour), remove it from the heat and discard the tea bags (if using).
Pour cream (through a strainer if using loose tea) over your dark chocolate. Leave to rest for approx 5 minutes - this will allow the hot cream to melt the chocolate.
Then stir the cream and chocolate together until it is a beautiful, silky, uniform consistency. While you’re there, give it a taste test - you will taste chocolate first, but then pay attention to the developing flavour and aftertaste of the Earl Grey coming through.
If your ganache still has lumps of chocolate in it and you’re freaking, JUST CALM DOWN.
Zap your bowl of ganache in the microwave for 20-30 seconds and then give it another stir. That should be enough to melt any remaining chunks. Repeat if necessary.
Keep the ganache in the microwave-safe bowl and allow it to set at room temp. Ensure you cover the ganache with plastic wrap, pushing the plastic wrap against the ganache so no air can get in and make it crusty.
Note: This recipe uses a 1:3 ratio, but you can change the ratio depending on the weather and what you are using the ganache for.