

"I want people who read this book to believe in themselves the way we did. I want you to trust you can bake amazing bread at home and maybe even turn it into a business, like we did."
Russell and partner Mia opened Baker Blue in Melbourne in 2016 with no employees and Mia still working to support them.
"It was just the two of us. Literally, I’d bake, Mia would serve, we’d clean everything down and do it again the next day. We had our life savings, three bread recipes and nothing else. But we were hungry to do something of our own."
Russell did not have a straightforward journey to baking, spending most of his 20s in search of the thing that "made me tick" and trying to avoid a 9 to 5 job.
"I wanted to do something that lit me up."
He found it when he discovered baking. It began visiting Spain and Argentina and their food cultures where great bread was the vehicle for many different things. Then while working for Rockpool Bar and Grill he learned to make everything from brioche to cookies and cold desserts and it emphasised that all he wanted to do was bake bread.
"I loved baking bread because it was making something from start to end. It was a craft that had been practised for centuries using the same basic elements: flour, water, heat, time. And yet every time you did it, you were back at square one, no matter how many years you’d been baking. A baker is only as good as his last loaf."

His new obsession grew into a vocation and he took jobs in several top bakeries in Sydney and Melbourne.
"Making sourdough bread or yeasted Italian doughs, handshaping and crafting croissants and working at a much larger scale pushed me. But I couldn’t stop thinking and talking about bread."
Despite his chequered employment past - writing advertising, washing dishes and waiting tables, looked into pig farming and cider brewing, studied pastry - he felt bread making was going to stick.
Five years later the pair opened their first bakery three days a week, selling three things - bagels, baguettes and a 2kg country loaf. Four years after that, Mia left her part-time job and they have moved into much bigger premises.
They have also opened a bakery in Sydney right next door to Nigel Perry’s Margaret and now they employ more than 80 people.
The book includes plenty of advice on tools and ingredients as well as recipes for making a sourdough starter, country loaves, ciabatta, bagels, challah, brioche and pies and cookies. He also includes recipes for ways to serve the bread - in tapas and sandwiches.
The Book
Images and text from Baker Bleu by Mike Russell, photography by Parker Blain. Murdoch Books RRP $55.00
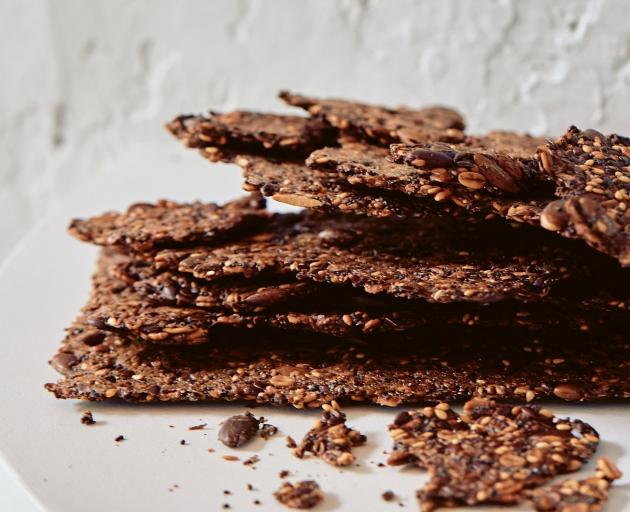 Lilli’s health crackers
These crackers from Lilli Reed, our manager in Melbourne, have become a staple grocery item sold in our bakeries in Melbourne and Sydney. The idea came from all the excess seeds that fall off our seeded ficelles, bagels and loaves.
We store the seeds collected from our bread crates, mix through fresh seeds and add oats and other ingredients on hand at the bakery to make these delicious, healthy and moreish crackers. They make the perfect vehicle for cheese or avocado, and are a lighter replacement for bread.
Makes about 40 crackers
Ingredients
230g multi-seed mix (see below)
115g pepitas (pumpkin seeds)
25g chia seeds
35g psyllium husk
170g oats
530g filtered water, at 28°C
50g maple syrup
15g olive oil
Method
Mix all the dry ingredients together. Place the wet ingredients in a large bowl, mix well, then add the dry ingredients. Combine all the ingredients with your hands, making sure everything is really well incorporated. Cover and leave to rest for 2 hours in the fridge.
While the cracker mix is resting, prepare your baking paper. You’ll need two pieces of baking paper per tray, cut to the same size as each tray. Brush each sheet with a thin layer of oil.
Heat the oven to 170°C. Remove the cracker mix from the fridge and weigh out 170g portions, placing each on a sheet of baking paper. Cover with a second sheet of baking paper and roll out to a thickness of about 3mm. Peel off the top sheet of baking paper and slide the rolled cracker, still on its sheet of baking paper, on to a baking tray.
Use your dough scraper to score the cracker mix into your desired cracker size. We suggest scoring in half lengthways and then making four or five scores the other way. Repeat rolling and scoring until you’ve used all of the cracker mix.
Bake trays, in batches, for 15 minutes, then rotate them 180 degrees, reduce heat to 150°C , and bake for a further 30 minutes until crisp and dry. Repeat with remaining trays.
Remove crackers from oven, allow to cool, then divide into portions along the scoring marks.
Multi-seed mix
This is our go-to when we want to introduce flavour to anything: pastry, bread, pizza, cheesy dishes, even salads ... The secret to the flavour of this mix might lie in the unhulled sesame seeds.
Why hulled sesame seeds even exist is a mystery to Mia and me. Hulling removes flavour and fibre. Always seek out unhulled seeds.
Makes 700g
Ingredients
200g unhulled sesame seeds
200g linseeds
150g caraway seeds
100g poppy seeds
50g sea salt flakes (we like to use Tasman)
Method
Mix all the seeds and the salt flakes in a bowl with a wooden spoon.
Store in an airtight container for several weeks.
If you’re using this in a salad or to top a soup, you can toast the mix in a hot pan for a few minutes before using.
 Rhubarb pie
I’ve suggested making this pie with a lid, but there’s no reason why you can’t use a lattice pattern on top here.
Makes 2 x 18cm pies
Ingredients
970g rhubarb, leaves trimmed, cut into 2.5cm pieces
270g raw sugar, plus extra for sprinkling
35g cornflour (cornstarch)
3g fine salt
1 quantity of khorasan pie dough, formed into a shell, with lid or strips (see below)
1 egg, lightly beaten
Method
Combine the rhubarb and raw sugar in a large mixing bowl, cover and refrigerate overnight.
The next day, drain the liquid from the rhubarb into a saucepan, reserving ¼ cup (60ml) in a separate bowl. Add the cornflour and salt to this reserved rhubarb liquid and mix with a spoon to create a slurry.
Place the saucepan over medium heat, stirring occasionally until the liquid warms to around 80°C , then stir in the cornflour slurry and return to a simmer, simmering gently until the mixture is clear and thickened.
Remove from the heat, add the rhubarb pieces and stir to coat, then cool to room temperature.
Heat the oven to 170°C. Add the cooled filling to the unbaked pie shell.
Place the circular lid on top, crimping the edge where the two pieces of pastry meet.
Brush the lid with the beaten egg, then sprinkle the whole top of the pie generously with raw sugar. Finally, cut a hole in the centre (about 1cm) with a small, sharp knife to allow steam to escape while the pie bakes.
Bake for 50–60 minutes, then remove from the oven and allow to cool in the tin for about 1 hour. Remove from the tin and cool on a wire cooling rack for a further 10 minutes before serving.
Sweet khorasan pie dough
2 pie tins, 18cm in diameter
One of the golden rules of making shortcrust pastry such as this is to avoid overdeveloping the dough, otherwise you won’t get the flakiness that makes it so desirable. Apple-cider vinegar is your secret weapon in achieving that texture. It has a counteractive effect on gluten development, so will prevent any toughness from creeping in. More importantly, it also adds a lovely tart edge to sweet items. With the nutty flavour of the khorasan, you’ll find this recipe tastes a little different from your average shortcrust; although we use it for pies, it’s also a great base for sable biscuits and tarts, including chocolate or caramel.
A couple of things to keep in mind: it’s really crucial that you have large, almost coin-sized, shards of butter through the dough. Then when you’re mixing the dough, bring it just beyond still being raggedy and falling apart - overmixing destroys the flakiness you get from the big pieces of butter.
Ingredients
460g Unsalted butter, plus extra for greasing
200g Filtered water
770g Khorasan flour or baker’s flour will also give a fine result.
8g Fine pink salt
20g Apple-cider vinegar
115 Raw sugar, plus extra for sprinkling
Method
Your first priority is to chill all the ingredients that need to be cold. Dice the butter into roughly 2cm cubes, then place it in the fridge for 40 minutes to 1 hour (if you’re short on time, you can get away with half that time). Measure the water into a large jug and also place it in the fridge.
Add the flour and salt to a large mixing bowl and whisk to combine. Add the chilled butter and begin to combine things by squeezing the butter and dry ingredients together with your fingertips. The flour will start to coat the butter and, after a couple of minutes, the whole mix will start to look shaggy. It’s important not to overmix the dough, so keep an eye on things; when it’s ready, you should be able to see discs of butter coated in flour.
Remove the chilled water from the fridge. Add the vinegar and sugar to the water and whisk them all together thoroughly so the sugar dissolves.
Create a well in the centre of your shaggy flour-butter mix, and pour in half the vinegar mixture. Start to incorporate the shaggy dough with your hand, working first in the centre, then slowly working outwards towards the edge of the bowl. As a dough begins to form, gradually add the rest of the liquid. You may not need it all; this is a dough that should look on the dry side, but once you bake it, the coarse bits of butter will release moisture, so it’s better to add less liquid now. It should still look scraggly.
Once the pastry has just come together (again, avoid overmixing), you should be able to see the shards of butter in it. This will be your flakiness. Form the dough into a loose rectangle, cover well with plastic wrap or a bag and refrigerate for 1 hour to rest.
Remove the dough from the fridge, dust your bench with flour and, with the longest side facing you, start rolling out the dough with a floured rolling pin or wine bottle. Continue rolling until you start to see the edge of the dough form cracks. As soon as this happens, rotate the dough 90 degrees.
Continue with this rolling and rotating method until you’ve rolled the dough to 3mm thick. As you’re rolling, make sure that the dough isn’t sticking to the bench and that it’s not getting sticky or warm on your rolling pin. If it is, transfer it to the freezer on a tray for a few minutes (no more than 5 minutes), to firm back up.
Once the dough is rolled out, take your pie tin and place it upside down on top of the dough to use as a cutting guide. Cut around the pie tin with a sharp knife, ensuring you’ve added 2.5 cm of buffer around the circumference to allow for shrinkage. You should easily get two pie cases out of this recipe, or you can make a lid or a lattice.
To make a lid, roll about 200g of pastry to 2mm thickness, in a circular shape. Place an empty pie tin on your pastry (right-way up) and cut around it like a template, then take this piece of dough, put it on a tray and place it in the fridge to chill for 20 minutes.
To cut strips for a lattice, gather up the dough scraps and form them into a ball, then chill for 5 minutes in the freezer (if you’re baking the same day; otherwise freeze it and thaw before use). Roll out the scraps into a rectangle, 3mm thick. With a sharp knife, cut strips about 2.5cm wide and set aside, covered with a tea towel.
Set the pie shell(s) and/or the lid aside (if you’ve made two shells and don’t want to bake two pies now, freeze one shell).
Heat the oven to 170°C. Grease the inside of your pie tin (I like to use the packaging that’s left over from the diced butter). Line the tin with one of the pastry shells, pushing it into the edges gently with your thumbs, then gently up against the walls of the tin. At this point you can leave the pie shell in the fridge overnight (covered) if you like and you can roll out and cut the lattice the next day.
Fill the pie with your chosen filling. Follow above recipe.
 Pistachio, white chocolate and cherry cookies
We love the pistachios that we get from Eric Wright at Go Just Nuts, grown on a farm in sunny Mildura, hundreds of kilometres north of Melbourne. He brines his pistachios so they’re super crunchy. These cookies show them off fabulously.
Makes 20
Ingredients
220g plain (all-purpose) flour
80g rye flour
5g baking powder
8g bicarbonate of soda (baking soda)
8g fine salt
135g unsalted butter, at room temperature
105g pistachio paste (see note)
265g soft brown sugar
65g caster (superfine) sugar
65g eggs (about 1½)
40g egg yolks (from about 2½ eggs)
95g white chocolate, roughly chopped
95g dried cherries, roughly chopped
195g shelled unsalted pistachio nuts, roughly chopped
Method
Place the flours, baking powder, bicarbonate of soda and salt into a large bowl and combine with a whisk. Set aside.
Place the butter, pistachio paste, brown sugar and caster sugar in the bowl of a stand mixer fitted with the paddle attachment. Cream the ingredients on medium speed for 5 minutes until light and fluffy.
Switch to low speed and add the whole eggs and yolks in two batches, scraping down the sides of the bowl and making sure the first batch is fully incorporated before adding the next. Mix until all the egg is incorporated.
Add the bowl of dry ingredients and mix on low speed until just combined.
Add the white chocolate, cherries and 95g of the pistachios and mix briefly until evenly distributed.
Use a spoon or quarter-cup to scoop out pieces of the cookie dough about 60g in weight. Roll each piece into a ball, then press to flatten into discs.
Place the discs on baking trays or in a proofing tray lined with baking paper and cover with a tea towel or a lid, then refrigerate for 4 hours or overnight to rest.
Half an hour before baking, heat the oven to 180°C and spread the remaining 100g of chopped pistachios on to a plate or baking sheet.
Remove the cookies from the fridge 10 minutes before baking. Press one side of each cookie into the chopped pistachios, then place the cookies on to a baking tray lined with baking paper (you may need a few trays) about 5cm apart, with the nuts facing up.
Bake for 7 minutes, at which point remove the trays from the oven and gently tap them on a bench before placing them back in the oven for a final 3 minutes or so until the cookies are browned around the edges. (The tapping will give you nice flat cookies with a chewy texture.)
Remove the cookies from the oven and allow them to cool on the trays for 10 minutes before transferring to a wire rack to cool completely.
Cookies will keep in a sealed container at room temperature for 3–4 days.
Note
Pistachio paste should be 100% pure pistachio butter. Read the ingredients list carefully. It can be bought from health food shops or specialist baking shops.


